
 Latest images
Mon Jul 08, 2013 3:56 pm by Admin
For the benefit of 944Hybrids users there are two search functions available for you to use.
The purpose of this sticky is to explain the "Advanced Search" function because it is much more powerful and is the best choice when researching information.
When you log on to the site a list of options is shown in a line at the top of the page. One option is labelled "Search", use this option (NOT the search box lower down on the right).
After you click on the upper search option, a drop down box appears. At the bottom of this box is a radio button marked "Advanced …
Comments: 0
Ray's 1987 944 LS1 Build & Swap
Page 1 of 14 • 1, 2, 3 ... 7 ... 14 ![]()

Ray's 1987 944 LS1 Build & Swap
![]() Raymond-P Fri Jul 25, 2014 6:26 pm
Raymond-P Fri Jul 25, 2014 6:26 pm
After joining the Forum over a year ago, the time has finally come to begin sharing my Porsche Project adventure of rebuilding a 2002 Pontiac WS6 LS1 motor and swapping it into a 1987 Porsche 944S. This Forum is truly excellent and I'm compelled to give back!
July 2023 UPDATE:
My Porsche Project thread has developed into the resource I had hoped it would be and I have many of you to thank for that. However, it has been brought to my attention that navigating the thread to find what you need is somewhat "challenging" even with the advanced search feature of the Forum. To address this, I've created the following INDEX that identifies the Post Title (topic) with the Forum Page No. where it is located, and it includes links so you can get there fast.
Post Titles are listed in the order they appear on the Page.
Ray's 1987 944 LS1 Build & Swap
POST TITLE INDEX
Forum
Page#/Post Title/Link Content Notes (Work in Progress)
1 Introduction - History
1 The Block
[You must be registered and logged in to see this link.]
1 Valve Train & Heads
[You must be registered and logged in to see this link.]
1 Pushrods and Rocker Arms
[You must be registered and logged in to see this link.]
1 Valley Cover and Beyond
[You must be registered and logged in to see this link.]
1 Vent Tube Modification
[You must be registered and logged in to see this link.]
1 Blocking LS1 Rear Steam Vents
[You must be registered and logged in to see this link.]
1 Windage Tray and Pick-up Tube
[You must be registered and logged in to see this link.]
1 Front Timing & Rear Main Cover
[You must be registered and logged in to see this link.]
1 ATI Harmonic Balancer
[You must be registered and logged in to see this link.]
1 FAST 92mm Intake Rebuild
[You must be registered and logged in to see this link.]
1 FAST Fuel Rails & Injectors
[You must be registered and logged in to see this link.]
1 Water Pump, Throttle Body & Coil Packs
[You must be registered and logged in to see this link.]
2 Reply to 87 944S in Maryland
[You must be registered and logged in to see this link.]
2 TCP Oil Pan
[You must be registered and logged in to see this link.]
2 TCP Oil Filter Adapter
[You must be registered and logged in to see this link.]
2 TCP Pilot Bearing Adapter & flywheel
[You must be registered and logged in to see this link.]
2 TPC Clutch and SPEC Pressure Plate
[You must be registered and logged in to see this link.]
2 TPC Throw-out Bearing
[You must be registered and logged in to see this link.]
2 Starter & Bellhousing Dust Shield
[You must be registered and logged in to see this link.]
2 Alternator, PS Pump, MAXJAX Etc.
[You must be registered and logged in to see this link.]
3 Engine Swap Begins...Finally!!
[You must be registered and logged in to see this link.]
3 Preparing to Pull the 2.5
[You must be registered and logged in to see this link.]
3 Extraction at Last!!
[You must be registered and logged in to see this link.]
3 Back at it...Finally!
[You must be registered and logged in to see this link.]
3 TPC Hydro-boost Kit
[You must be registered and logged in to see this link.]
3 Torque Tube Bearings
[You must be registered and logged in to see this link.]
3 Transaxle and Torque Tube Removal, Parts 1-3
[You must be registered and logged in to see this link.]
3 Torque Tube Rebuild – Help Needed
[You must be registered and logged in to see this link.]
3 Delrin Bushing Update
[You must be registered and logged in to see this link.]
3 Torque Tube Rebuild
[You must be registered and logged in to see this link.]
4 Axle Shaft Replacement Options
[You must be registered and logged in to see this link.]
4 Transaxle Make-Over Complete
[You must be registered and logged in to see this link.]
4 AC Considerations
[You must be registered and logged in to see this link.]
4 TPC Hydro-Boost Install
[You must be registered and logged in to see this link.]
4 Rust-Oleum Red (Cherry)
[You must be registered and logged in to see this link.]
4 Headers & Spark Plugs Wires
[You must be registered and logged in to see this link.]
4 Oil Temp Sensor
[You must be registered and logged in to see this link.]
4 TPC Motor Mounts
[You must be registered and logged in to see this link.]
NA* TPC Motor Mount Bushing Upgrade (*on a separate thread)
[You must be registered and logged in to see this link.]
4 Indexing Top Dead Center
[You must be registered and logged in to see this link.]
4 Priming the Oil Galleries
[You must be registered and logged in to see this link.]
5 AC Compressor Replacement
[You must be registered and logged in to see this link.]
5 New Heat Shield
[You must be registered and logged in to see this link.]
5 Mini-Starter Installation
[You must be registered and logged in to see this link.]
5 Starter, Alternator, & Ground Wiring
[You must be registered and logged in to see this link.]
5 Urethane Stiffening of Transaxle Mount
[You must be registered and logged in to see this link.]
5 Final Drive Shaft Projection Check
[You must be registered and logged in to see this link.]
5 Installing the Motor AT LAST!!!
[You must be registered and logged in to see this link.]
5 Header Clearance Modifications
[You must be registered and logged in to see this link.]
5 Power Steering Rack - Part 1 Rehab & New Ball Joint Boots
[You must be registered and logged in to see this link.]
6 Front Spindle, Hub, and Brake Rehab
[You must be registered and logged in to see this link.]
6 Brake Caliper Rebuild - Front
[You must be registered and logged in to see this link.]
6 Power Steering Rack - Part 2 High Pressure Lines
[You must be registered and logged in to see this link.]
6 Power Steering Rack - Part 3 Clearance Check
[You must be registered and logged in to see this link.]
6 Power Steering Rack - Part 4 Steering Shaft Connection
[You must be registered and logged in to see this link.]
6 Control Arm Ball Joint Boot Replacement
[You must be registered and logged in to see this link.]
6 Radiator and Thermostat, Research Phase
[You must be registered and logged in to see this link.]
7 Front Sway Bar Installation
[You must be registered and logged in to see this link.]
7 Hydro-Boost Install - Part 2 High Pressure Lines
[You must be registered and logged in to see this link.]
7 Hydro-Boost Install - Part 3 Low Pressure Lines
[You must be registered and logged in to see this link.]
7 Hydro-Boost Install - Part 4 Coil Pack Relocation
[You must be registered and logged in to see this link.]
7 PS Pump Reservoir UPDATE
[You must be registered and logged in to see this link.]
7 Coil Pack Relocation UPDATE
[You must be registered and logged in to see this link.]
7 Hydro-Boost Install - Part 5 Brake MC Reconditioning & Clutch MC Replacement
[You must be registered and logged in to see this link.]
7 Hydro-Boost Install - Part 6 Brake MC & Coil Pack Install
[You must be registered and logged in to see this link.]
7 Hydro-Boost Install - Part 7 New MC Brake Lines & #5 Plug Wire
[You must be registered and logged in to see this link.]
7 TPC Radiator Install - Intro
[You must be registered and logged in to see this link.]
7 TPC Radiator Install - Part 1 Body Prep
[You must be registered and logged in to see this link.]
7 TPC Radiator Install - Part 2 Fan Prep
[You must be registered and logged in to see this link.]
7 TPC Radiator Install - Part 3 Fan/Rad Assembly (Updated)
[You must be registered and logged in to see this link.]
7 Condenser Install
[You must be registered and logged in to see this link.]
8 Drier Replacement - Proposed AC Line Diagram
[You must be registered and logged in to see this link.]
8 Fuel Line Modifications – Planning
[You must be registered and logged in to see this link.]
8 Heater Control Valve Installation
[You must be registered and logged in to see this link.]
8 Oil Pressure and Temp Sensor Installation
[You must be registered and logged in to see this link.]
8 GM Purge Valve
[You must be registered and logged in to see this link.]
9 PCV and HVAC Vacuum Lines
[You must be registered and logged in to see this link.]
9 Fuel Line Modifications – Engine Side
[You must be registered and logged in to see this link.]
9 Electrical System - Part 1 Wiring for Coil Packs, Sensors, Battery
[You must be registered and logged in to see this link.]
9 Throttle Cable
[You must be registered and logged in to see this link.]
9 Rear Crossmember and Axle Replacement
[You must be registered and logged in to see this link.]
10 Axle Seal Replacement
[You must be registered and logged in to see this link.]
10 5th Gear Set Swap
[You must be registered and logged in to see this link.]
10 Rear Crossmember Install
[You must be registered and logged in to see this link.]
10 Transaxle Protection Plate
[You must be registered and logged in to see this link.]
10 Transaxle Installation - Part 1 Prep
[You must be registered and logged in to see this link.]
10 Transaxle Installation - Part 2 Transmission
[You must be registered and logged in to see this link.]
10 Transaxle Installation - Part 3 Axles & VSS
[You must be registered and logged in to see this link.]
10 Oil Cooler Install - Part 1 Rehab
[You must be registered and logged in to see this link.]
10 Fuel Pump Install - Part 1 Tank Strainer
[You must be registered and logged in to see this link.]
10 Electrical System - TPC Temp Sensor Lead Wire
[You must be registered and logged in to see this link.]
10 Fuel Pump Install - Part 2 Pump & Filter-Regulator
[You must be registered and logged in to see this link.]
10 Fuel Pump Install - Part 2 Rear Fuel Lines
[You must be registered and logged in to see this link.]
11 Fuel Pump Test - Update 5-20-23
[You must be registered and logged in to see this link.]
11 Fuel Pump Capacity… Second Thoughts
[You must be registered and logged in to see this link.]
11 Oil Cooler Install - Part 2
[You must be registered and logged in to see this link.]
NA* Brake Caliper Rebuild - Rear (*on a separate thread)
[You must be registered and logged in to see this link.]
11 Hand Brake Rebuild
[You must be registered and logged in to see this link.]
11 Bleeding the Brakes
[You must be registered and logged in to see this link.]
11 TPC Oil Pan Drain Plug Fix & Break-in Procedure
[You must be registered and logged in to see this link.]
12 Bleeding the Clutch Slave Cylinder
[You must be registered and logged in to see this link.]
12 Bleeding the Clutch Slave Cylinder - UPDATE
[You must be registered and logged in to see this link.]
12 Shifter Installation
[You must be registered and logged in to see this link.]
12 Exhaust Part 1 - Car Relocation
[You must be registered and logged in to see this link.]
12 Initial START-UP!!! (with open header video)
[You must be registered and logged in to see this link.]
12 Exhaust Part 2 - Fabrication (with base tune video)
[You must be registered and logged in to see this link.]
12 Gremlin #1 - Engine Clatter
[You must be registered and logged in to see this link.]
12 Gremlin #2 - Hydro-Boost Manifold Leak
[You must be registered and logged in to see this link.]
12 Exhaust Part 3 - Final Installation
[You must be registered and logged in to see this link.]
12 Gremlin #1 - Engine Clatter - UPDATE (with correct AF ratio video)
[You must be registered and logged in to see this link.]
12 Gremlin #2 – Hydro-Boost Manifold Leak - UPDATE (with High Rev video)
[You must be registered and logged in to see this link.]
12 AC Help Summary - viperbmw69 AC Question Reply
[You must be registered and logged in to see this link.]
12 OTR Custom Air Cleaner Intake Tube
[You must be registered and logged in to see this link.]
13 OTR Intake Tube – Part 2, Test Print
[You must be registered and logged in to see this link.]
13 OTR Intake Tube – Part 3, Changing Direction
[You must be registered and logged in to see this link.]
13 OTR Intake Tube - Part 4, Done at Last!
[You must be registered and logged in to see this link.]
13 OTR Intake Tube - IAT Sensor Installation
[You must be registered and logged in to see this link.]
13 Hood Pins Part 1 - Mounting Brackets
[You must be registered and logged in to see this link.]
13 Hood Pins Part 2 - Hood Latch Install
[You must be registered and logged in to see this link.]
13 Front Panel & Instrument Cluster
[You must be registered and logged in to see this link.]
14 Fuel Gauge Gremlin
[You must be registered and logged in to see this link.]
14 DYNO DAY
[You must be registered and logged in to see this link.]
Final MS3 Pro Wiring
Steering Wheel Replacement
Enjoy!
I realize many folks opt to transplant a decent stock LS1 and enjoy the 325 HP. I wanted a little more and had a PA winter in front of me so I rebuilt the engine with a few goodies to hopefully produce 400 HP or more. I'll know for sure in a month or so....
It all started when the water pump in the Porsche started leaking and grounded the car. While surfing the Web for parts I came across a post by a guy who swapped in an LS1 in lieu of a timing belt change on his NA. That sounded pretty cool to me. Not long afterwards, my future son-in-law at the time buys me Greg Sloan's book on 944 conversions for a Christmas gift. Now I'm hooked on building my own super car!!
So I checked to see if my stock 944S has any collector value since only around 5000 made it to the USA in '87. Apparently not yet... and since it has the good spindles and stronger trans-axle, full speed ahead with the swap.
The 1st order of business was finding a proper LS1 from an F-Body GM to start with. My nephew solved that problem and sold me his 2002 Pontiac WS6 motor he pulled because of a suspicious "ticking" sound. Turned out to be a cracked header primary tube.
My experience on the Forum is that folks want to know how much a motor build costs. The answer is all across the board depending on your target HP but it is definitely not for the faint of heart (or wallet!)
My motor build cost is pushing $10,000 with $6,400 in new parts so far....about $1500 in machine shop services, and $2,000 for the original LS1. I had a professional engine shop put the bottom end together and set up the 241 heads just for my own piece of mind. Yes, the total cost is more than a GM crate engine but the build components are the same ones my engine builder uses in his $30K race engines (except mega-buck heads) eliminating all the weak components, and it should be able to rev over 7K all day long.
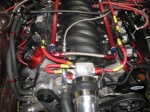
For the conversion pieces, I opted for the TPC Deluxe LS Engine Conversion Kit and long tube headers, C5 Bell Housing and SPEC Stage 1 flywheel, clutch and pressure plate.
Below is a pic of the engine 95% complete when I did a test fit of the headers. I'll be posting pics soon of each major assembly step with a special focus on anything related to the conversion. Please feel free to ask me any questions.
[You must be registered and logged in to see this image.]
Last edited by Raymond-P on Mon Apr 15, 2024 7:01 pm; edited 33 times in total (Reason for editing : Index Link update)

Raymond-P- Posts : 380
Join date : 2013-06-29
Age : 68
Location : Beaver, PA
lvkid76 and Bruce da moose like this post
The Block...
![]() Raymond-P Sun Jul 27, 2014 3:31 am
Raymond-P Sun Jul 27, 2014 3:31 am
[You must be registered and logged in to see this image.]
Inside the block, upgraded components include:
- Wiseco K398X3903 Piston & Ring Kit ($689)
- Eagle ESP H-Beam Rods 6100M3D ($520)
- COMP Cams LSR™ Cath. Port Camshaft PN 54-459-11 ($395)
Lift: .617/.624 Duration: 231/239 @ 0.050 Lobe Separation: 113 degrees
455 hp @ 6200 / 421 lbs-ft @ 5000 (2000-7000 rpm range) (advertised with FAST intake)
This cam is a little bigger than the GMPP HOT CAM and a little smaller than the Lingerfelter GT11
[You must be registered and logged in to see this image.]
- Cam bearings ($19)
- Main bearings ($156)
- Rod Bearings (Calico Coated) ($136)
- ARP Main Stud kit ($247)
Block work included:
- Cleaning and integrity check. ($60) No cracks thankfully!
- 0.005" cylinder bore clean-up cut ($120)
- Cam bore alignment cut and install new cam bearings ($30)
- Deck flatness true-up check (NC - none needed)
- Crankshaft degrease, magniflux check & polishing ($20 - no cutting needed)
- File piston rings ($60)
- Pin fit pistons and connecting rods ($80)
- Install pistons on connecting rods ($40)
- balance rotating assembly ($225)
[You must be registered and logged in to see this image.]
Externally new components include:
- Melling Oil Pump LS1/LS6 with 10% volume increase ($116)
- Cloyes HP True Roller Hex-Adjust Timing Set ($176)
- Install & Degree Camshaft and Oil Pump ($60)
The COMP cam is ground at 4 degrees advanced for optimal performance but note in the pic below how after a professional dial in with a degree wheel, a 1 degree adjustment was needed. The center dot is "zero" timing and the first dot to the left is 2 degrees advanced. After assembly without the Hex-Adjust, the cam would have been operating at only 3 degrees advanced.
[You must be registered and logged in to see this image.]
Installing the valve train and heads will be next....
Raymond-P- Posts : 380
Join date : 2013-06-29
Age : 68
Location : Beaver, PA
VALVE TRAIN and HEADS
![]() Raymond-P Sun Jul 27, 2014 11:25 pm
Raymond-P Sun Jul 27, 2014 11:25 pm
Head work included:
- Degreasing, Bead Blast & Integrity Check ($40)
- 3 Angle Valve Job ($200)
- Head Flatness True-up Cut ($70)
- Spring Height & Pressure Balancing ($60)
[You must be registered and logged in to see this image.]
New parts installed by the shop include:
- Viton 11/32 x .500 Valve Seals ($20)
- COMP Cams Street/Strip Dual Valve Spring Kit w/Tool Steel Retainers ($490)
- COMP Cams Spring Shim Kit ($20)
Before the heads could be bolted on, a number of other new items had to be installed in the block...including:
- COMP Cams Hyd. Roller Lifters ($217) These were oil soaked 24 hrs and prepped with assembly lube prior to installation.
- GM LS2/7 Style Lifter Tray Set ($20) Simple intall.
[You must be registered and logged in to see this image.]
- ARP Head Stud Kit ($334) All studs treated with Permatex PTFE Thread Sealant.
[You must be registered and logged in to see this image.]
Importantly, all head bolt hole threads were thoroughly cleaned using an old head bolt modified with a disc cut-off tool to create cutting groves.
[You must be registered and logged in to see this image.]
Unlike a running motor rebuild when you have to deal with eliminating absolutely all liquid from the head bolt holes, I had to contend with removing all the old dried up factory sealant material. Each hole took about 3 or 4 cycles with the tool before it was clean and smooth. Although the cutting grooves seemed to retrieve a lot of the debris, I decided to try blowing out the bores with compressed air using a piece of shrink wrap tubing as an extension to get to the bottom. What a surprise!!! I have a video of the dust plumes produced if anyone is interested. Can't post AVI files.
- Street Pro Cometic 0.051" Head Gasket Set MLS (Multi-Layer Steel) ($180)
[You must be registered and logged in to see this image.]
Studs are in, Cometic gaskets in place, ready for the heads...
[You must be registered and logged in to see this image.]
Just need to add the ARP hex nuts and torque to ARP specs. One more thing...the ARP stud kit comes with ARP washers used for other bolt applications as well and they have a chamfered side that must be fit against the bolt flange. Since I'm using studs and a nut it's a non-issue. I elected to put the chamfered side against the head and apply the ARP ultra-torque lube between the nut and the washer.
[You must be registered and logged in to see this image.]
Pushrods and Rocker Arms are next....
Last edited by Raymond-P on Tue Jul 29, 2014 2:00 am; edited 3 times in total (Reason for editing : Added head gasket thickness)
Raymond-P- Posts : 380
Join date : 2013-06-29
Age : 68
Location : Beaver, PA
Re: Ray's 1987 944 LS1 Build & Swap
![]() docwyte Mon Jul 28, 2014 8:35 am
docwyte Mon Jul 28, 2014 8:35 am
You've got a great intake, big cam, nice motor and the heads will be the choke point...
docwyte- Posts : 1393
Join date : 2010-07-18
Re: Ray's 1987 944 LS1 Build & Swap
![]() Raymond-P Mon Jul 28, 2014 10:31 pm
Raymond-P Mon Jul 28, 2014 10:31 pm
[You must be registered and logged in to see this link.]
I guess I'll just add the 243s to my bucket list!
Raymond-P- Posts : 380
Join date : 2013-06-29
Age : 68
Location : Beaver, PA
Re: Ray's 1987 944 LS1 Build & Swap
![]() JJR512 Tue Jul 29, 2014 1:42 am
JJR512 Tue Jul 29, 2014 1:42 am
docwyte wrote:The 241 heads are some of the worst flowing heads out there. Not sure why you decided against picking up a set of 243's, which are still a cathedral style from the LS6/2 and are far better than the 241's. Especially given all the work you put into the motor, 243's are available used for $400.
You've got a great intake, big cam, nice motor and the heads will be the choke point...
What's the other head that's supposedly as good as the 243? I think maybe it's 799 if I'm not mistaken. Any thought/opinions on that?
JJR512- Posts : 4
Join date : 2014-07-10
PUSHRODS AND ROCKER ARMS
![]() Raymond-P Tue Jul 29, 2014 3:32 am
Raymond-P Tue Jul 29, 2014 3:32 am
This can be done several ways but I elected to use a Pushrod Length Checker tool and my new rocker arms. New components for this part:
- COMP Cams Pushrod Length Checker ($25)
- COMP Cams Ultra-Gold
 ARC Series Aluminum Rocker Arms: GM LS; 8mm Stud, 1.72 Ratio ($460) Ouch! …but sweet.
Measurements should be taken at a minimum of three cylinders to confirm an accurate length. Below is the Reader's Digest version of my approach.
1. For each cylinder selected, rotate the crank until the piston is TDC on the compression stroke so the lifters are on the base circle of the cam.
2. Thoroughly cover the tops of the valve stems with black permanent marker.
3. Screw the Pushrod Length Checker tool in to its minimum dimension (6.800”) and install in the lifter.
4. Install the rocker arm being careful not to damage the permanent marker coating.
5. Unscrew the tool counting the revolutions as you go until it makes contact with the rocker and there is zero lash. Each revolution is 0.050”. I consistently got between 10.5 and 11 turns per valve.
6. Rotate the crank several revolutions and return to TDC.
7. Remove the rocker and observe the marking on the valve stem.
There should be a straight line just a skosh inboard of centerline. Too far inboard and the pushrod is too short…too far outboard and the pushrod is too long. ( Someone please correct me if I have that backwards.
 ) In the pics below, you can see that both my intake and exhaust marks were dead on.
 [You must be registered and logged in to see this image.]
…so after checking 2 other cylinders, I used 11 turns @ 0.050” = 0.550 plus 6.800” = 7.350” and I bought pushrods at that length.
- COMP Cam Hi-Tech
Magnum Pushrods, Chrome-moly 3/8" Diameter, 7.350" ($115)[You must be registered and logged in to see this image.]
The acquired pushrods and the new rockers were installed in pairs at each cylinder with the piston at TDC of the compression stroke. You have to admit, it’s a crime to cover up something that beautiful!!
[You must be registered and logged in to see this image.]
Valley Cover is next….(Pardon any nonsense, omissions or typo’s, got a little late on this one.)
Raymond-P- Posts : 380
Join date : 2013-06-29
Age : 68
Location : Beaver, PA
Re: Ray's 1987 944 LS1 Build & Swap
![]() docwyte Tue Jul 29, 2014 10:31 am
docwyte Tue Jul 29, 2014 10:31 am
Yeah, they made good power with those 241's, but look at the motor they were attached to, a built 408...
docwyte- Posts : 1393
Join date : 2010-07-18
VALLEY COVER AND BEYOND....
![]() Raymond-P Wed Aug 06, 2014 1:52 am
Raymond-P Wed Aug 06, 2014 1:52 am
Before installing the valley cover I cleaned it up of course, installed new GM knock sensor grommets from Summit NAL-12558177 ($8.00) and a new GM gasket from Summit NAL-12558178 ($21)
[You must be registered and logged in to see this image.]
Note the new grommet on the right has a new design for an improved seal.
[You must be registered and logged in to see this image.]
If you use a FAST intake, clearance is limited and button head cap screws are required to secure the valley cover.
[You must be registered and logged in to see this image.]
Before installing the gasket on the block, I used a touch of Permatex Ultra Copper sensor safe RTV (orange) to fill in what appeared to be some gouges from transporting the block around in the back of my nephew's pick-up. Also installed the oil pressure sensor and cam position sensor at the back of the engine. Teflon thread sealant on both.
[You must be registered and logged in to see this image.]
The valley cover was then set in place, the cap screws torqued to 18 ft-lbs, and the knock sensors installed.
[You must be registered and logged in to see this image.]
...sensors wired up, the original (reconditioned) LS1 vent tube installed along with a new set of Holley cast aluminum valve covers in black HLY-241-91 ($173) (a little deeper that stock for that big cam) with new FelPro gaskets, FEL-VS50504R ($18).
[You must be registered and logged in to see this image.]
I found out during a trial fit with my FAST 92MM intake that the stock LS1 vent tube was not going to work. More on that later.
Front and rear engine covers and the TPC Custom Oil Pan install are next....
Last edited by Raymond-P on Sat Aug 09, 2014 1:37 am; edited 1 time in total (Reason for editing : SP Typo)
Raymond-P- Posts : 380
Join date : 2013-06-29
Age : 68
Location : Beaver, PA
VENT TUBE MODIFICATION
![]() Raymond-P Sat Aug 09, 2014 2:54 am
Raymond-P Sat Aug 09, 2014 2:54 am
The simple yet costly solution is the LS6 Vent Tube kit which contains a front only crossover tube and rear passage blocks. I read that some folks reconstruct/adapt the LS1 vent tube components and it works just fine. I opted to buy the genuine GM units from JEGS:
809-12602544 LS COOLANT X-OVER PIPE ($41)
809-12602540 AIR BLEED BLOCK OFF LS ($20)
[You must be registered and logged in to see this image.]
It would have been nice if this just bolted right on but I still had to do some custom bending to clear the FAST intake. Lots of "bend & test." It was originally straight/flat in the horizontal plane. Now it curves under the intake.
[You must be registered and logged in to see this image.]
Once I had it right, I coated the connections with teflon thread sealer just to be safe and tightened the bolts to 106 in-lbs.
[You must be registered and logged in to see this image.]
Below is a pic of the LS6 vent tube kit installed. The knock sensor wires just barely fit under the FAST intake. Man those rocker arms are sharp!!
[You must be registered and logged in to see this image.]
One more thing.... My engine pro advised me to re-torque the ARP studs before I put the intake on because that was the last opportunity to access the small studs of the top row. I decided to do that now and re-torqued them all to ARP specs. I did get some movement. One slight exception I should mention. I was directed to used 75 ft-lbs for the large studs vs. ARP's 80 ft-lbs. This was based on my engine pro's personal experience with some pulled studs. He successfully uses 75 ft-lbs in all his builds. That works for me!!
Front and back covers are next....and then the FAST 92mm intake reconditioning and installation.
Last edited by Raymond-P on Sat Aug 09, 2014 3:22 am; edited 1 time in total (Reason for editing : Added comment on head stud re-torque.)
Raymond-P- Posts : 380
Join date : 2013-06-29
Age : 68
Location : Beaver, PA
Re: Ray's 1987 944 LS1 Build & Swap
![]() Lemming Sat Aug 09, 2014 8:39 am
Lemming Sat Aug 09, 2014 8:39 am

Lemming- Posts : 855
Join date : 2011-05-30
Location : B'ham
Re: Ray's 1987 944 LS1 Build & Swap
![]() Raymond-P Sun Aug 10, 2014 12:28 am
Raymond-P Sun Aug 10, 2014 12:28 am
Lemming wrote:Very nice, looking forward to seeing the rest of the build.
Thanks man! I love feedback because it lets me know my posting efforts are appreciated. I have lots more coming....
Raymond-P- Posts : 380
Join date : 2013-06-29
Age : 68
Location : Beaver, PA
Re: Ray's 1987 944 LS1 Build & Swap
![]() Lemming Sun Aug 10, 2014 8:20 am
Lemming Sun Aug 10, 2014 8:20 am
Lemming- Posts : 855
Join date : 2011-05-30
Location : B'ham
BLOCKING LS1 REAR STEAM VENTS
![]() Raymond-P Sun Aug 10, 2014 8:32 pm
Raymond-P Sun Aug 10, 2014 8:32 pm
Lemming wrote:I've been considering blocking off my rear steam ports, but have read mixed reviews on doing so. What convinced you to do it?
Lemming....there is a plethora of posts out there discussing the steam vent issue, specifically "to vent or not to vent." And as you know, one must be careful before acting on any Internet data.
If you already have 4 vents all functioning and no reason to block them then I would just leave them be. As others have stated…it’s a good insurance policy.
If you want to upgrade to an LS6 or FAST intake….using the LS6 vent tube kit like I did should work just fine.
The underlying problem is that on LS1 & LS6 motors, the low pressure cooling system outlet is lower than coolant passages present at the top of the block. This affords entrapment of air in the cooling system that may have not been effectively purged.
(In engine platforms of yesteryear, cooling passages were incorporated up to the intake manifold where the thermostat lived and the low pressure return hose from the radiator was connected…well above any engine or head coolant passage.)
Trapped pockets of air prevent cooling of adjacent casting material and subsequent hot spots that not only weaken the surrounding material (i.e. the cylinder walls) but increase the likelihood of pre-detonation. Both are bad news especially in high demand situations like we all love to drive in.
GM engineers solved this problem by incorporating steam vents at the upper 4 corners of the block and connecting them all via vent tubing to the low pressure side of the cooling system to permit release.
Now along comes FAST with this awesome new intake and the vent tubes are in the way….same with GM and the improved LS6 intake…no room underneath for vent tubes. Personally for performance, this extra heat source under the intake didn’t make sense to me.
Apparently FAST and GM are on the same page for the solution and I’m sure plenty of thought went into their decision. GM blocked the back vents on the LS6 applications and FAST indicates in their installation instructions for LS1 owners to use the LS6 vent tube kit which contains vent blocks for the back vents. These guys have an entire business market to preserve and they're not going to take any chances with small issues like this....that works for me!
Personally I think one vent on each side of the block is sufficient to get the job done, which BTW should actually be a onetime deal with a closed system. I've done some BMW work and they have a manual cooling system vent to bleed off trapped air, not unlike bleeding brakes. Once you're done, close the vent and forget it. If you can successfully purge all the air from the cooling system then you don’t really need a vent. The problem is…how do you really know with an LS motor?
Below is a link to the FAST LSX installation instructions. I believe the LS6 vent tube PNs they used are outdated because they don’t match the ones I recently purchased from GM. (Although… I did need to modify that front cross over pipe for a FAST intake!)
[You must be registered and logged in to see this link.]
These are the PNs that produce results in GM Parts Direct:
• GM Part # 12602544 - LS6 front steam vent crossover pipe
• 2 x GM Part # 12602540 - LS6 rear steam vent pipe plugs
Raymond-P- Posts : 380
Join date : 2013-06-29
Age : 68
Location : Beaver, PA
WINDAGE TRAY & OIL PICK-UP TUBE
![]() Raymond-P Mon Aug 11, 2014 1:57 am
Raymond-P Mon Aug 11, 2014 1:57 am
Below is one last look at the completed bottom end…. and my 24X reluctor wheel just for the record.
[You must be registered and logged in to see this image.]
I even got my engine builder’s “autograph” from his balancing work on the rotating assembly!
[You must be registered and logged in to see this image.]
For a stock bottom end this would be a simple bolt on procedure, however the ARP studs used for the main bearing caps require modification to the windage tray. All of the mounting holes and the oil pick tube mount must be drilled out to fit the larger ARP stud diameter...1/2” diameter holes do the trick.
[You must be registered and logged in to see this image.]
...and you must create some clearance for the inboard main cap stud at the center main bearing... see the red dot in the first pic.
[You must be registered and logged in to see this image.]
All are pretty quick fixes. Just had to be sure to completely clean away all metal shavings before going near the engine again!!
With the aforementioned holes drilled as required, the windage tray could be set into place. Next I pre-lubed the O-ring and pressed it on the TPC pick-up tube, pressed the tube into the oil pump, and hand tightened the hold down bolt and all the windage tray nuts. Checking the fit on the oil pump confirmed a nice flush fit.
[You must be registered and logged in to see this image.]
The windage tray nuts were then tightened to 28 ft-lbs as per ARP (18 ft-lbs for stock units) and the pick-up tube hold down bolt was tightened to 106 in-lbs. Looked like a good fit all around.
[You must be registered and logged in to see this image.]
Then I did a trial fit of the TPC Oil Pan and….”Houston we have a problem.”
The black circle is the point of interference with the pan.
[You must be registered and logged in to see this image.]
I contacted TPC and returned the oil pan and pick-up tube for some mods. Eric made the necessary adjustments and had them back to me in no time. While I was waiting, I prepared the front and back cover plates for installation. That’s next…really…
Raymond-P- Posts : 380
Join date : 2013-06-29
Age : 68
Location : Beaver, PA
FRONT TIMING COVER & REAR MAIN COVER
![]() Raymond-P Tue Aug 12, 2014 2:20 am
Raymond-P Tue Aug 12, 2014 2:20 am
[You must be registered and logged in to see this image.]
Some before and after....
Rear / Main Cover
[You must be registered and logged in to see this image.]
Front / Timing Chain Cover
[You must be registered and logged in to see this image.]
New parts include:
Timing Cover Gasket and Seal- FelPro BS40640 - AutoZone ($24)
Oil Galley Plug - Chevrolet Performance NAL-12573460 Summit / ($7)
Rear Cover Gasket - NAL-12639249 Summit / Chevrolet Performance ($22)
New and improved GM Oil Galley Plug (white)....notice the deeper position of the o-ring seal for better function. Just pry out the old one with an ice pick or knife blade and hand press in the new one.
[You must be registered and logged in to see this image.]
Both covers in place with new seals and gaskets. Silicone gaskets were installed “dry” with no sealant. Rear cover carefully centered on the crankshaft with some lube on the seal and evenly with respect to the block oil pan mounting surfaces so both sides were basically flush. Rear cover bolts torqued to 18 ft-lbs.
[You must be registered and logged in to see this image.]
Front cover bolts get tightened to 18 ft-lbs eventually but were only hand tightened until I installed my ATI Super Damper harmonic balancer to properly locate the cover.
That will be next….
Raymond-P- Posts : 380
Join date : 2013-06-29
Age : 68
Location : Beaver, PA
HARMONIC BALANCER
![]() Raymond-P Wed Aug 13, 2014 9:36 pm
Raymond-P Wed Aug 13, 2014 9:36 pm
ATI Super Damper Serpentine Series Harmonic Balancer 917276 – ($424)
ARP Balancer Bolt Kit, ARP 234-2503 ($32)
[You must be registered and logged in to see this image.]
This is what 10% under drive looks like. Keeps the accessories within acceptable spin rates during high engine RPMs and should be good for a few more realized HP.
[You must be registered and logged in to see this image.]
The first step is to install the hub. Since I’m planning to maintain my AC the HB unit has a rear AC pulley which must be placed on the back of the hub before it’s installed on the crank snout. See the picture above.
I heated the hub in the oven at 200 degrees F for about 15 minutes expanding it for an easy install. Then I applied a coat of anti-seize and pressed it on with my homemade pipe press and a 15” crescent wrench. Caution: Never try to "pull" the HB on with your old HB bolt. It's just not long enough and you'll end up stripping out the end threads in your crank snout.
 I also understand that using a hammer to persuade a stubborn HB to the fully seated position is a big no-no as this would damage the crankshaft rear thrust bearing resulting in excessive end play in the crank.
 [You must be registered and logged in to see this image.]
The hub went on very smoothly and seated completely. As per my ATI instructions, I installed the old HB bolt to 230 ft-lbs of torque to assure the hub was seated and then I removed it. Hub extension beyond the crank was approximately 0.218” which is slightly more than the GM spec of 0.175”. I understand this is fine for the ATI HB unit. Since I was not keying my crank, I had to fill the keyway in the hub with sealant. I used Permatex PermaShield.
[You must be registered and logged in to see this image.]
Next I prepped the new ARP HB bolt & washer as per ARP instructions placing ARP Ultra Lube on both sides of the washer and the threads. I also added some red Loctite as per the ATI instructions. (Man that stuff is expensive!) Final torque on the ARP HB bolt, 235 ft-lbs.
[You must be registered and logged in to see this image.]
Finally the damper shell is installed on the hub using 6 flat head machine screws torqued to 16 ft-lbs and 3 pulley bolts torqued to 30 ft-lbs. Blue Loctite used on all.
[You must be registered and logged in to see this image.]
All finished!
[You must be registered and logged in to see this image.]
Lastly, I made sure the front timing chain cover was well centered on the crank snout and hand tightened all the bolts. Then I went back and torqued them all to 18 ft-lbs.
FAST Intake rebuild is next….
Last edited by Raymond-P on Wed Aug 20, 2014 11:18 pm; edited 2 times in total (Reason for editing : Text edit. HB Installation Caution)
Raymond-P- Posts : 380
Join date : 2013-06-29
Age : 68
Location : Beaver, PA
Re: Ray's 1987 944 LS1 Build & Swap
![]() Marky522 Sun Aug 17, 2014 8:17 am
Marky522 Sun Aug 17, 2014 8:17 am
Mark
Marky522- Posts : 175
Join date : 2009-06-29
Re: Ray's 1987 944 LS1 Build & Swap
![]() jimlam56 Wed Aug 20, 2014 4:58 pm
jimlam56 Wed Aug 20, 2014 4:58 pm
I am a ways away from starting my swap, as I am going through the suspension and brakes first.
Just curious, but did you consider buying a crate engine? (But you don't have the fun of assembling your own engine...)
I've seen some LS3 crates for around $6500.
Thanks again,
Jim
jimlam56- Posts : 12
Join date : 2014-05-25
Re: Ray's 1987 944 LS1 Build & Swap
![]() Raymond-P Wed Aug 20, 2014 9:47 pm
Raymond-P Wed Aug 20, 2014 9:47 pm
GM crate engines are indeed an attractive option for street cars. For my engine build I started out thinking I could build something better for less money.....silly me! Hopefully I've succeeded a little in the "better" department because I definitely flunked in the "less money" department.
My downfall was not wanting to compromise and that adds up to big bucks, plus I kept telling myself, "you're only going to do this once so why not!"
The day I paid the balance on my machine work and bottom end assembly, I asked the engine shop experts if I made a mistake by not buying a crate engine. They assured me I was going to be very happy with my engine performance and that I would be able to get 100+K of hard miles out of it. Now that may be their standard answer but they are one of the premier racing engine builders in my tri-state area and they only deal with crate engines when the customer insists. He did share a few stories of drag racers whose crate engines didn't last one racing season.
So at the end of the day it's all about your budget and the intended use for your ride.
I must admit...building your own is very satisfying and educational, not to mention therapeutic.
Raymond-P- Posts : 380
Join date : 2013-06-29
Age : 68
Location : Beaver, PA
Re: Ray's 1987 944 LS1 Build & Swap
![]() jimlam56 Thu Aug 21, 2014 5:00 am
jimlam56 Thu Aug 21, 2014 5:00 am
Your answer was exactly what I thought it would be. My hat's off to you!
jimlam56- Posts : 12
Join date : 2014-05-25
FAST 92mm INTAKE REBUILD
![]() Raymond-P Sun Aug 24, 2014 10:19 pm
Raymond-P Sun Aug 24, 2014 10:19 pm
The Wilson FAST 92mm Intake reportedly adds 15 HP over the stock LS1 intake. Add long tube headers and “a cam” and you can get more...much more. Below is what mine looked like when I got it from my nephew.
[You must be registered and logged in to see this image.]
For my build, I went with TPC’s custom long tube headers and that big COMP cam. In fact COMP Cams recommends the FAST intake for maximum performance.
The FAST 92mm sold in the Summit Racing Catalog for $950 before it was replaced by the 102mm unit. There is apparently enough demand for them that good used ones are still bringing that price on E-bay.
Since my intake was several years old and had been out of service for a while to boot, I figured there was no reason not to rebuild it. Seemed easy enough…
FAST 92mm Intake – Say $900 Market Value
FAST replacement Inner Rope Seal – PN FST-54022 (15’-6” long) Summit Racing: $25
FAST replacement Port Seals – PN FST-54009-8: Summit Racing $24
[You must be registered and logged in to see this image.]
Just 6 small bolts hold the upper and lower shell together, and 10 Philips head screws hold the bottom half of the runners in place on the lower shell. (8 on top, 2 on the bottom) Below are the disassembled parts:
[You must be registered and logged in to see this image.]
After a full surface clean up, the next step was removal of every trace of factory runner and rope seal sealant. This stuff appeared to be the black RTV variety and was barely adhered if at all in the rope seal joints and about 20% of the runner interface valleys of the base unit. Clearly fuel exposure had impacted the adhesion. I must admit however that where it was intact, I had a hard time removing it.
So….my next question was, “What is the best sealant to use for reassembly?” Most intake rehab accounts I read simply referred to “silicone sealant” and some mentioned Permatex Black RTV. In researching my options, it seemed to me that “fuel resistant” was essential, and just that one criterion ruled out many RTV products including Permatex Black RTV which is only “oil” resistant. I was also concerned about any excess sealant that might make its way into the runners and how I was going to trim that off. After a lot of shopping, I decided to use Permatex PermaShield because it is fuel resistant and non-hardening. Plus…I could take my good old time assembling the unit without worrying about the sealant setting up and compromising the seal.
Permatex PermaShield Fuel Resistant Flange Sealant: $10 per tube
[You must be registered and logged in to see this image.]
Assembly was simple but a tad tedious.
Step 1: Apply sealant to the U-shaped runner interface valleys of the base unit. This is where any excess ends up in the runner so I did test fits until I knew how much sealant to use without overflow. About 50% full was the ticket.
[You must be registered and logged in to see this image.]
Step 2: Place the lower runner half section in the base unit and tighten the mounting screws. This is a gradual process of repeating a balanced tightening sequence until all the screws are just tight. Keep in mind that tight just means that the screw doesn’t turn anymore. Over tighten and you will strip the composite material….so be careful.
Step 3: Check runner interiors for any excess sealant and remove. There shouldn’t be much if any.
Step 4: Install the neoprene rope seal around the perimeter of the lower half. Cut to fit.
[You must be registered and logged in to see this image.]
You will have one butt joint…I placed that joint at the throttle body end at 6 o’clock with the idea that it was a clean straight cut.
[You must be registered and logged in to see this image.]
Step 5: Install individual lengths of neoprene rope seal along each runner. Cut to fit. You will need to do this 9 times.
[You must be registered and logged in to see this image.]
Step 6: Apply sealant at each joint and then gently press the neoprene completely into the seal channel throughout. A flat blade screwdriver worked just fine for me.
[You must be registered and logged in to see this image.]
Step 7: Install the Top Half Shell. Tighten the 3 front and 3 rear (short) manifold bolts just enough to snug everything up. These 6 bolts in concert with the 10 main (long) manifold bolts will squeeze the whole unit together. Use blue Loctite (242) on all manifold bolts. Looking like an intake again!
[You must be registered and logged in to see this image.]
Step 8: Install the new port seals.
[You must be registered and logged in to see this image.]
Step 9: Make sure the intake port surfaces of the heads are clean and dry and install the manifold. Follow the FAST tightening sequence.
[You must be registered and logged in to see this image.]
Keep in mind that as you tighten the bolts you’re compressing the neoprene seals so multiple passes should be used to get all the bolts to the designated torque. FAST recommends the following 2 passes:
First pass – 45 in-lbs
Final pass – 89 in-lbs
Over-torquing will damage the manifold and cause improper sealing.
The end result looks like new and should function like new as well.
[You must be registered and logged in to see this image.]
Next will be new FAST fuel injectors and FAST fuel rails….
Raymond-P- Posts : 380
Join date : 2013-06-29
Age : 68
Location : Beaver, PA
FAST FUEL RAILS & INJECTORS
![]() Raymond-P Sun Sep 07, 2014 2:32 am
Raymond-P Sun Sep 07, 2014 2:32 am
The Wilson FAST 92mm intake would likely perform just fine with GM fuel rails and injectors…but I just had to push the envelope. Something in my head just kept saying, “You have a FAST intake…just stick with FAST fuel system components and everything will work well together.” After some research and a nagging feeling that the factory 28#/hr injectors may come up short, I opted for an upgrade.
The FAST Fuel Rail package and injectors are designed for better performance which admittedly is attractive…plus they look really great…but this is another perfect example of “budget creep!” Below are the parts I ended up purchasing:
FAST Billet Aluminum Fuel Rail Kit with fittings: PN FST-54023, Summit Racing, $219
FAST Line Conversion Kit LSX W/Gauge: PN FST-FST-54028G-KIT, Summit Racing, $145
FAST 36#/hr Injectors: PN FST-303608, Summit Racing, $331
[You must be registered and logged in to see this image.]
First I connected the aluminum mounting blocks to the fuel rails with the screws provided but I left them somewhat loose until I had everything installed.
Installing the injectors in the fuel rail was the next order of business. The FAST 30360 injectors are the longer units that work with the FAST intake and should provide ample fuel for my NA 7000 RPM engine setup.
[You must be registered and logged in to see this image.]
I lubed the o-rings with synthetic oil and pressed the injectors into the fuel rails.
[You must be registered and logged in to see this image.]
Before installing the assembly in the manifold, I did a little cleaning of the injector ports. They looked clean enough at first glance during the overall manifold scrub down but some carb cleaner and a Q-tip proved otherwise. Lots of black residue…
[You must be registered and logged in to see this image.]
I applied synthetic oil on the nozzle end O-rings of the injectors and pressed them gently into the manifold until they were completely seated. Then I installed the hold down bolts. After confirming that all the injectors were seated and not stressed in any way, I tightened the anchor block screws and the hold down bolts. Pretty straight forward…
[You must be registered and logged in to see this image.]
Water Pump is next....
Raymond-P- Posts : 380
Join date : 2013-06-29
Age : 68
Location : Beaver, PA
WATER PUMP, THROTTLE BODY & COIL PACKS
![]() Raymond-P Sun Sep 07, 2014 3:12 am
Raymond-P Sun Sep 07, 2014 3:12 am
I got to use my bead blaster again which is always fun. Below are before and after pics:
[You must be registered and logged in to see this image.]
The impeller turned smoothly but there was clearly some water leakage from the back cover indicating seal failure.
[You must be registered and logged in to see this image.]
I removed the back cover and got it all cleaned up, applied some PermaShield, installed a new cover seal and put it all back together. Tightened the rear cover bolts to 11 ft-lbs.
Water Pump Cover Seal, 35633 Fel-Pro, AutoZone - $1.49
[You must be registered and logged in to see this image.]
While I was at it…I replaced the old thermostat with a 160F unit in hopes that it would help the engine run cooler. It took a while to actually find where they labeled the opening temperature.
[You must be registered and logged in to see this image.]
Inlet Housing & 160F Thermostat, PN 37960, DuraLast, AutoZone - $30
I was surprised the thermostat was integral with the inlet housing but that explains the price. Upon comparison of the units, I discovered that the old unit did not open far enough to close the baffle opening in the pump. I’m glad I sprung for the new thermostat although I’m hoping it wasn’t a waste of money since I see folks are using a swivel head Omni-directional unit for better capatibility with the radiator. Tightened the inlet housing bolts to 11 ft-lbs.
[You must be registered and logged in to see this image.]
Then it was off to the “Paint Booth” (aka my garage floor!) for some hi-temp silver paint.
[You must be registered and logged in to see this image.]
After the paint dried, I installed the neoprene water pump gaskets from the timing cover gasket set. These could probably have been installed dry but I applied a thin coat of PermaShield anyway. Then I applied Teflon thread sealant to the bolts and installed the pump. Tightened the water pump bolts in two passes, 11 and then 22 ft-lbs.
[You must be registered and logged in to see this image.]
The throttle body I’m using is a Jantzer LSX 92mm CNC Billet Throttle Body, obtained from my nephew with the FAST intake, $200 - $300 Street Value… so I’m told.
[You must be registered and logged in to see this image.]
Since I had it off, I went ahead and picked up a new 92mm throttle body seal. Summit didn’t carry it, so I went to Autoplicity.
FAST 92mm Throttle Body Seal, FST-54041, Autoplicity - $11
[You must be registered and logged in to see this image.]
With the new throttle body seal in the manifold, I bolted on my Jantzer 92mm throttle body….and my new LS2 coil packs. I had to pick up the LS2 coil packs to match the
standard LS3 Bolt Spacing of 72mm on the Holley “Angled Coil” valve covers. Sold the old LS1 coil packs for $150!
AC Delco LS2 Coil Packs, Item# 360671285215, AD Autoparts Inc. - $180
[You must be registered and logged in to see this image.]
The vision is materializing!!!
[You must be registered and logged in to see this image.]
TPC Oil Pan is next….
Raymond-P- Posts : 380
Join date : 2013-06-29
Age : 68
Location : Beaver, PA
Re: Ray's 1987 944 LS1 Build & Swap
![]() 87-944S Sun Sep 07, 2014 7:20 pm
87-944S Sun Sep 07, 2014 7:20 pm
87-944S- Posts : 744
Join date : 2009-06-10
Location : Maryland
Page 1 of 14 • 1, 2, 3 ... 7 ... 14 ![]()
» 944 Turbo TPC Radiator Install Help Needed
» Rear coilover suspension setup
» Best engine uprights/plates
» LEAKING TPC HYDROBOOST
» HYDRAULIC THROWOUT/RELEASE BEARING NOT ENGAGING FULLY
» Ray's 1987 944 LS1 Build & Swap
» LS 982 5speed project here
» LT1 Spark Plug make and model
» 928 5-speed kit