
 Latest images
Mon Jul 08, 2013 3:56 pm by Admin
For the benefit of 944Hybrids users there are two search functions available for you to use.
The purpose of this sticky is to explain the "Advanced Search" function because it is much more powerful and is the best choice when researching information.
When you log on to the site a list of options is shown in a line at the top of the page. One option is labelled "Search", use this option (NOT the search box lower down on the right).
After you click on the upper search option, a drop down box appears. At the bottom of this box is a radio button marked "Advanced …
Comments: 0
Xschop's 5.3 LM7 build
Page 6 of 17 •  1 ... 5, 6, 7 ... 11 ... 17
 ![]()
Re: Xschop's 5.3 LM7 build
![]() xschop Sat Aug 28, 2010 8:23 pm
xschop Sat Aug 28, 2010 8:23 pm
[You must be registered and logged in to see this image.]
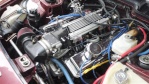
NA Radiator does the Job, just removed the nose cross obstruction.....
The turnsignals fit in the foglight holes too when the TPC nose is used.....
[You must be registered and logged in to see this image.]
Ebay oil relo adapter and oil pressure sender fits perfect behind the foglight when the driver's towhook is modded.....
[You must be registered and logged in to see this image.]
Interior is done.....
Got rid of the DJ Mann Blaupunkt too...Yeah Boi! Time for a sub update next....
[You must be registered and logged in to see this image.]

xschop- Posts : 2711
Join date : 2009-06-09
Location : OKC
Re: Xschop's 5.3 LM7 build
![]() Wild Bill Sun Aug 29, 2010 8:46 pm
Wild Bill Sun Aug 29, 2010 8:46 pm
Wild Bill- Posts : 121
Join date : 2010-01-04
Location : Canada

xschop- Posts : 2711
Join date : 2009-06-09
Location : OKC
Bumps in the trunk
![]() xschop Mon Sep 06, 2010 11:23 am
xschop Mon Sep 06, 2010 11:23 am
End result is some serious bass and accurate with no ugly vibrations
[You must be registered and logged in to see this image.]
Last edited by xschop on Fri Jan 21, 2011 9:32 am; edited 1 time in total
xschop- Posts : 2711
Join date : 2009-06-09
Location : OKC
Re: Xschop's 5.3 LM7 build
![]() Admin Mon Sep 06, 2010 11:55 am
Admin Mon Sep 06, 2010 11:55 am
Admin- Admin

- Posts : 1448
Join date : 2009-06-08
Age : 65
Location : Arlington,Texas -

Re: Xschop's 5.3 LM7 build
![]() cfgioja Mon Sep 06, 2010 1:14 pm
cfgioja Mon Sep 06, 2010 1:14 pm
Ran two kicker 12's under my 2001 Silverado ex. cab, even though the boxes were smaller than factory recommended air space.

cfgioja- Posts : 804
Join date : 2009-11-22
Age : 39
Location : Clarksville, AR
Re: Xschop's 5.3 LM7 build
![]() xschop Tue Sep 07, 2010 7:22 am
xschop Tue Sep 07, 2010 7:22 am
I do have a 3" dia. x 6" port that I was going to initially install, but wanted to hear what it sounded like at first so I could keep it all stealth and under the factory carpet. I like it so much, I will leave it as is....
Hifonics HFi 12D4
Subwoofer Size 12"
Voice Coil(s) Dual (2 voice coils)
Impedance (per voice coil) 4 ohms
Peak Power Handling 600 watts
RMS Power Handling 300 watts
Woofer Surround Rubber
Woofer Composition Injection Molded Polypropylene (IMPP)
Sealed Box Volume 1.25 - 2.15 cubic feet
Ported Box Volume 1.75 - 2.5 cubic feet
Sensitivity 88 dB
Frequency Response N/A
Xmax (millimeters) 11 mm
Top Mount Depth 5-3/4"
Cutout Diameter 11.0"
Recommended Enclosure Type Sealed or Vented
xschop- Posts : 2711
Join date : 2009-06-09
Location : OKC
Re: Xschop's 5.3 LM7 build
![]() xschop Tue Sep 07, 2010 10:37 am
xschop Tue Sep 07, 2010 10:37 am
xschop- Posts : 2711
Join date : 2009-06-09
Location : OKC
Re: Xschop's 5.3 LM7 build
![]() Wild Bill Tue Sep 07, 2010 4:18 pm
Wild Bill Tue Sep 07, 2010 4:18 pm
I LOVE setting off car alarms!!
Wild Bill- Posts : 121
Join date : 2010-01-04
Location : Canada
Real World #'s
![]() xschop Thu Sep 09, 2010 2:28 pm
xschop Thu Sep 09, 2010 2:28 pm
With the Iron Block installed.....
53.7 % FRONT 1600 lb
46.3 % REAR 1380 lb
----------------------------
Total 2980 lb
[You must be registered and logged in to see this image.]
xschop- Posts : 2711
Join date : 2009-06-09
Location : OKC

modenas- Posts : 285
Join date : 2009-06-08
Age : 35
Location : lubbock tx
Re: Xschop's 5.3 LM7 build
![]() xschop Thu Sep 09, 2010 7:45 pm
xschop Thu Sep 09, 2010 7:45 pm
[You must be registered and logged in to see this image.]
xschop- Posts : 2711
Join date : 2009-06-09
Location : OKC
Re: Xschop's 5.3 LM7 build
![]() modenas Thu Sep 09, 2010 8:28 pm
modenas Thu Sep 09, 2010 8:28 pm
modenas- Posts : 285
Join date : 2009-06-08
Age : 35
Location : lubbock tx
Re: Xschop's 5.3 LM7 build
![]() xschop Wed Sep 15, 2010 2:55 pm
xschop Wed Sep 15, 2010 2:55 pm
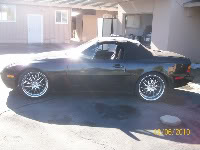
Been well over 500 miles since the swap and took it on a high speed run to see what 5th can do...Looks like @150 mph. Not sure of the RPMs as my tach is still the only thing I haven't done. I noticed driving to work yesterday that I had vibes thru the steering wheel. Sure 'nuff 150mph will throw a stickered lead weight right off so had it rebalanced at lunch and took some pics....
The Lexus Brakes and Boxster Rotors are broke in with no funny scarring. After the cadmium coating wears off the rotors they bite even harder!....
[You must be registered and logged in to see this image.]
My camera phone broke a few weeks back and here is a shot of the hub mod that was lost. I lathed off 5.5 mm from the face of the hub cover insertion so the inside of the Turbo Twist II's would fit without any grinding..... there is still plenty of grab for the hub/spindle stub cover and comes off easily with a punch from the side.....
[You must be registered and logged in to see this image.]
Only the best for the DD Beast......100% petrol with a 1/640 ratio of Acetone/petrol......
The alcohol blends are sluggish in the 948
[You must be registered and logged in to see this image.]
xschop- Posts : 2711
Join date : 2009-06-09
Location : OKC
modenas- Posts : 285
Join date : 2009-06-08
Age : 35
Location : lubbock tx
Re: Xschop's 5.3 LM7 build
![]() Dawgz83948 Thu Sep 16, 2010 9:07 am
Dawgz83948 Thu Sep 16, 2010 9:07 am
Dawgz83948- Posts : 603
Join date : 2009-06-08
Location : Ca.
Re: Xschop's 5.3 LM7 build
![]() xschop Thu Sep 16, 2010 9:40 am
xschop Thu Sep 16, 2010 9:40 am
Come to OKC we have the best roads for control arm R&D and that's on 4x4's LOL
xschop- Posts : 2711
Join date : 2009-06-09
Location : OKC
Forsche Keys
![]() xschop Tue Sep 21, 2010 10:27 am
xschop Tue Sep 21, 2010 10:27 am
ILCO 73VB-P
Snapped some pics of the initial install of my rear Bumper mod to go with Eric's Front Bumper delete. I shaved off about 4-5lbs aluminum from the rear bumper and installed it right back with the fiberglass 1-piece..... I trimmed the side contact edges down flat and used 2-part Plastic Epoxy to bond.....It works great and only cost $3 per side. I used Liquid nails where it mates to the rear bumper. It's solid as I took it over 100 mph for a minute or two yesterday at my favorite desolated straight run LOL....
[You must be registered and logged in to see this image.]
xschop- Posts : 2711
Join date : 2009-06-09
Location : OKC
Re: Xschop's 5.3 LM7 build
![]() xschop Tue Sep 21, 2010 11:56 am
xschop Tue Sep 21, 2010 11:56 am
Good workmanship too. Thanks Eric.
[You must be registered and logged in to see this image.]
xschop- Posts : 2711
Join date : 2009-06-09
Location : OKC
Re: Xschop's 5.3 LM7 build
![]() modenas Wed Sep 29, 2010 6:13 am
modenas Wed Sep 29, 2010 6:13 am
modenas- Posts : 285
Join date : 2009-06-08
Age : 35
Location : lubbock tx
Re: Xschop's 5.3 LM7 build
![]() xschop Wed Sep 29, 2010 8:28 am
xschop Wed Sep 29, 2010 8:28 am
xschop- Posts : 2711
Join date : 2009-06-09
Location : OKC
Re: Xschop's 5.3 LM7 build
![]() Porch Wed Sep 29, 2010 9:37 am
Porch Wed Sep 29, 2010 9:37 am

Porch- Posts : 851
Join date : 2009-09-02
Age : 42
VSS
![]() xschop Fri Oct 01, 2010 5:42 pm
xschop Fri Oct 01, 2010 5:42 pm
[You must be registered and logged in to see this image.]
Look Ma, NO CATS!
Took it to the exhaust shop today to check for a leak as I started getting a backfire only on top end deceleration....lucky enoough to know after building many bikes that that means exhaust leak close to the exhaust ports....sure 'nuff a bolt came loose at the collector flange and was about to fall off...cranked it down and back off to the races..... I think I'm going to buy some Copper collector gaskets soon anyways....
[You must be registered and logged in to see this image.]
I had coated all welds with rust converter when the exhaust went in.....rust free.....
[You must be registered and logged in to see this image.]
I have a very small leak from the valley cover gasket that I need to see to next.....
This is the original C5 adapter plate......Doesnt look so shiney after 600 miles......
But the contour of the exhaust pipes after the modded Hooker 2312 headers makes the C5 2-piece BH removable bottom shroud a breeze to remove/install.....
[You must be registered and logged in to see this image.]
The Oil relocation lines clear the left exhaust by about 4 inches with the 2312 headers also.....
[You must be registered and logged in to see this image.]
Last edited by xschop on Fri Oct 01, 2010 5:51 pm; edited 1 time in total
xschop- Posts : 2711
Join date : 2009-06-09
Location : OKC
Re: Xschop's 5.3 LM7 build
![]() xschop Fri Oct 01, 2010 5:48 pm
xschop Fri Oct 01, 2010 5:48 pm
[You must be registered and logged in to see this image.]
RX7 calipers on the Rear 951 rotors broken in with no unusual scarring either....
[You must be registered and logged in to see this image.]
xschop- Posts : 2711
Join date : 2009-06-09
Location : OKC
Plug N Play Dash LED's
![]() xschop Tue Oct 05, 2010 9:32 am
xschop Tue Oct 05, 2010 9:32 am
Only takes 3 and you have a spare.....
[You must be registered and logged in to see this link.]
T5 bulbs fit in the smaller indicators if you can find them in twist-lock style like factory....or you can solder the regular T5 leads in the old ones after the glass-filament bulbs are removed
[You must be registered and logged in to see this link.]
I only put in.....Blinker indicator......"Parking Lights" warning......and High Beam indicators......and last but not least tossed the large red WARNING! bulb out, it's useless on the 948
All tail lights are now 42 LED 1156 bulbs.If you have a Euro/Canada car there are extra parking lights in the housings FYI.
Also I got rid of the factory 3rd brake light as it is bulky and in the way of my full view when I leave some smuck behind
While its on my mind, just spliced the red/white wire in the driver's side taillight housing round socket connector to the red(+) wire of the LED bar and ran the black ground wire to the same as my amp....
[You must be registered and logged in to see this image.]
xschop- Posts : 2711
Join date : 2009-06-09
Location : OKC
Page 6 of 17 • 1 ... 5, 6, 7 ... 11 ... 17 ![]()
» Adapter plate
» Fesler Saratoga Top
» Parts availability for general maintenance?
» What coilover spring rates are you running with torsion bar removed?
» 944 Turbo TPC Radiator Install Help Needed
» HYDRAULIC THROWOUT/RELEASE BEARING NOT ENGAGING FULLY
» Best engine uprights/plates
» Rear coilover suspension setup
» Ray's 1987 944 LS1 Build & Swap