
 Latest images
HOW TO DO AN ADVANCED SEARCH.
Mon Jul 08, 2013 3:56 pm by Admin
For the benefit of 944Hybrids users there are two search functions available for you to use.
The purpose of this sticky is to explain the "Advanced Search" function because it is much more powerful and is the best choice when researching information.
When you log on to the site a list of options is shown in a line at the top of the page. One option is labelled "Search", use this option (NOT the search box lower down on the right).
After you click on the upper search option, a drop down box appears. At the bottom of this box is a radio button marked "Advanced …
Comments: 0
Similar topics
Latest topics
Log in
Pilot bearing depth
3 posters
944Hybrids: 924/944/968 and 928 V8 Conversions :: Technical Stuff (other than motors) :: Transmission and Clutch Tech
Page 1 of 1

Pilot bearing depth
![]() lsporsche Sun Nov 29, 2015 7:15 pm
lsporsche Sun Nov 29, 2015 7:15 pm
What pilot bearing depth are we aiming for? With the TPC adaptor and bushing I'm measuring that only .300" of the pilot shaft will be inside the bearing. Is this adequate? I don't know what I would do to get the bushing further out.
lsporsche- Posts : 72
Join date : 2015-08-26

gdopnt- Posts : 127
Join date : 2012-11-12
Location : Rockford, Illinois
Re: Pilot bearing depth
![]() xschop Wed Dec 02, 2015 6:26 am
xschop Wed Dec 02, 2015 6:26 am
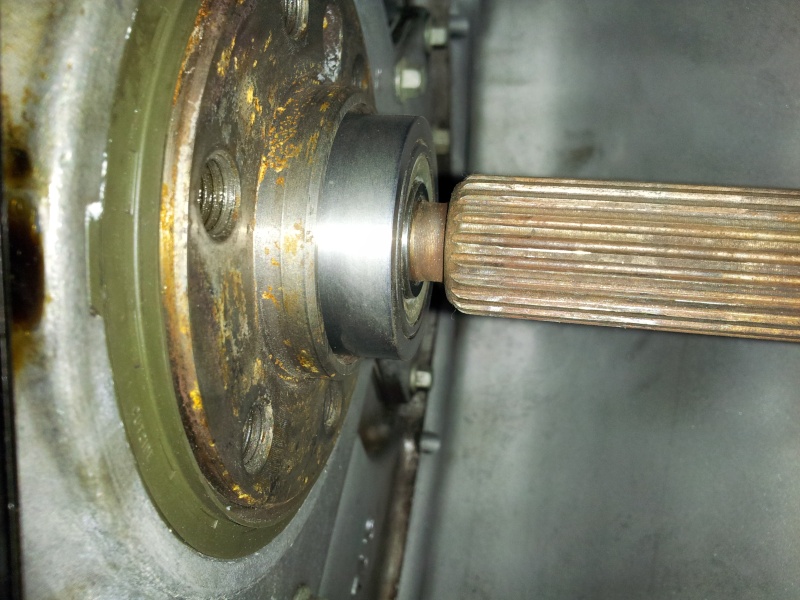
Properly done, the pilot bearing adapter should encroach the full land of the Torque tube input shaft tip. Gdopnt has it correct in 2nd pic....Are you measuring with the rear TT/trans coupler bolted up?

xschop- Posts : 2711
Join date : 2009-06-09
Location : OKC
Re: Pilot bearing depth
![]() lsporsche Wed Dec 02, 2015 9:26 am
lsporsche Wed Dec 02, 2015 9:26 am
Yes, the rear of the TT is all still assembled. I only have the 11mm deep bearing and I do seem to have enough gap between the clutch hub and bearing to step up to the 14mm deep variant. The rear (engine side) of the clutch hub doesn't protrude from the disk. That should put me at a depth of roughly .420. Still not the full surface of the tip (I believe its .500) but a lot closer..
Maybe my measurement is off some, I used the bellhousing surface as my measuring point. With the BH installed on the torque tube I measured BH surface to input shaft tip and measured BH surface on the engine to the outermost part of the pilot bearing. Subtracted measurement 1 from measurement 2 and the difference should be my contact area. I'll double check my measurements.
Maybe my measurement is off some, I used the bellhousing surface as my measuring point. With the BH installed on the torque tube I measured BH surface to input shaft tip and measured BH surface on the engine to the outermost part of the pilot bearing. Subtracted measurement 1 from measurement 2 and the difference should be my contact area. I'll double check my measurements.
lsporsche- Posts : 72
Join date : 2015-08-26
Re: Pilot bearing depth
![]() gdopnt Wed Dec 02, 2015 5:34 pm
gdopnt Wed Dec 02, 2015 5:34 pm
LS
You'll need to unbolt the coupler in the trans axle to pull the shaft forward. There is a rubber inspection boot on the trans, remove it and there's the coupler.
You'll need to unbolt the coupler in the trans axle to pull the shaft forward. There is a rubber inspection boot on the trans, remove it and there's the coupler.
gdopnt- Posts : 127
Join date : 2012-11-12
Location : Rockford, Illinois
Re: Pilot bearing depth
![]() lsporsche Wed Dec 02, 2015 9:18 pm
lsporsche Wed Dec 02, 2015 9:18 pm
Ok, I get that now. Thank you! Saw several references to that but it wasn't clicking what people meant.
I'm going to repost Marc A's post regarding how to do so to help anyone else that is trying to figure this out:
The position of the drive shaft in the torque tube is set by the factory. At the rear end of the torque tube the drive shaft is notched, as is the main shaft of the transmission, and the two joined by a coupler. The gap between the drive shaft and main shaft from the factory is less than a match book cover wide. I originally installed the clutch and pressure plate on the flywheel of the LS1 without even thinking to check whether the drive shaft was going to be positioned properly into the pilot bearing. This was my first mistake and caused the clutch hub/drive shaft failure mentioned above.
LESSON #1 - Install engine WITHOUT clutch and pressure plate FIRST and then bolt up bell housing with torque tube connected. This way you can see the position of the drive shaft "nose" as it relates to the pilot bearing. If you find the same thing that I did the drive shaft will have to be gently tapped forward (from the rear of the torque tube) until the nose of the drive shaft is fully engaged in the pilot bearing. I had to move my drive shaft about 1/4" forward. Moving the drive shaft forward requires the drive shaft to be "notched" so that the coupler can be installed with the new location of the drive shaft. The drive shaft is not hardened so a drill can be used to make the notch.
At this point connect the transmission to the bell housing, properly tightening the four mounting bolts. Slide the collar onto the drive shaft until the notch in the main shaft is aligned with the rear through hole of the coupler and install the allen head bolt all the way. Now check the position of the drive shaft nose to make sure it is still in the proper location. MAKE SURE THE CAMFER BEHIND THE NOSE DOES NOT TOUCH THE PILOT BEARING.
If all is in order, drill the drive shaft using the coupler as the die. Do not drill too far as you will hit the threads on the top side of the coupler. Once drilled install the allen head and check the nose one more time.
Now remove the transmission and back the torque tube out of the bell housing. Install the clutch and pressure plate and then re-attach the torque tube and transmission.
lsporsche- Posts : 72
Join date : 2015-08-26
Re: Pilot bearing depth
![]() gdopnt Wed Dec 02, 2015 10:28 pm
gdopnt Wed Dec 02, 2015 10:28 pm
That's pretty much it. There are couple ways to do it. I will not quote how much room there is pulling the shaft back and installing the clutch package because the clutch alignment tool used is how ever long. I did the fit up, moved the shaft forward, tightened down the coupler, then pulled the motor. I did not notch or drill any thing because I pulled the motor. I had more things to do so it worked for me. I will say it took two people the first time and was easy. I used an engine angle on the hoist. When the motor went in the final time it was harder for me because I was by my self so a lot of up and down changing the angle.
gdopnt- Posts : 127
Join date : 2012-11-12
Location : Rockford, Illinois
944Hybrids: 924/944/968 and 928 V8 Conversions :: Technical Stuff (other than motors) :: Transmission and Clutch Tech
Page 1 of 1
Permissions in this forum:
You cannot reply to topics in this forum
» Rear coilover suspension setup
» Best engine uprights/plates
» LEAKING TPC HYDROBOOST
» HYDRAULIC THROWOUT/RELEASE BEARING NOT ENGAGING FULLY
» Fesler Saratoga Top
» Ray's 1987 944 LS1 Build & Swap
» LS 982 5speed project here
» LT1 Spark Plug make and model
» 928 5-speed kit