
 Latest images
Mon Jul 08, 2013 3:56 pm by Admin
For the benefit of 944Hybrids users there are two search functions available for you to use.
The purpose of this sticky is to explain the "Advanced Search" function because it is much more powerful and is the best choice when researching information.
When you log on to the site a list of options is shown in a line at the top of the page. One option is labelled "Search", use this option (NOT the search box lower down on the right).
After you click on the upper search option, a drop down box appears. At the bottom of this box is a radio button marked "Advanced …
Comments: 0
My Porsche LS1 build
Page 4 of 5 •  1, 2, 3, 4, 5
 ![]()
Re: My Porsche LS1 build
![]() modenas Wed Jul 07, 2010 11:21 pm
modenas Wed Jul 07, 2010 11:21 pm

modenas- Posts : 285
Join date : 2009-06-08
Age : 35
Location : lubbock tx
Re: My Porsche LS1 build
![]() cfgioja Wed Jul 07, 2010 11:56 pm
cfgioja Wed Jul 07, 2010 11:56 pm
And you are using a different mount design than mine, The ones I have came from RH.

cfgioja- Posts : 804
Join date : 2009-11-22
Age : 39
Location : Clarksville, AR
Re: My Porsche LS1 build
![]() Luke714 Thu Jul 08, 2010 5:57 am
Luke714 Thu Jul 08, 2010 5:57 am
Would there be any harm in cutting that nub off? It looks like it is there if some accessory needs a mounting hole. If that isn't enough I can simply put some spacers under the upright mounting plate, right?
Thanks a million to everyone hear!
Luke714- Posts : 441
Join date : 2009-12-30
Age : 33
Location : Maine
Re: My Porsche LS1 build
![]() cfgioja Thu Jul 08, 2010 8:46 am
cfgioja Thu Jul 08, 2010 8:46 am
cfgioja- Posts : 804
Join date : 2009-11-22
Age : 39
Location : Clarksville, AR
Re: My Porsche LS1 build
![]() Luke714 Thu Jul 08, 2010 8:57 am
Luke714 Thu Jul 08, 2010 8:57 am
later,
Ls
Luke714- Posts : 441
Join date : 2009-12-30
Age : 33
Location : Maine
Re: My Porsche LS1 build
![]() Luke714 Wed Jul 14, 2010 7:10 pm
Luke714 Wed Jul 14, 2010 7:10 pm
[You must be registered and logged in to see this image.]
There can be anywhere from .5” to 1” of clearance between the head and the firewall, that’s with the rear cross member slotted. The LR mount seems to be working great. The setback plates and the uprights line up perfectly forward and aft, so I now know those are in the right position. Like it was suggested I’ll see if I can just forgo the alt brace.
[You must be registered and logged in to see this image.]
What I’m having a little trouble with now is the vertical position of the engine. I put the hood on and measured how high I could mount the engine without interfering, but the steering rack still hits the oil pan. I have also re-routed the PS lines to get the engine closer to the x member, but I’m going to have to do some more work on the pan no matter what. Unfortunately I think I’ll also have to use some .5” spacers and then make the uprights a little bit taller. This is ok because I’m getting the 19mm ball joints and geometry correction kit from Renn-bay. Can you cut away a little bit of the hood ridges to gain another .5”?
[You must be registered and logged in to see this image.]
I have got things to line up a better than what is shown in the picture, but still not great. The picture shows the general direction in which things are off, click to see the other mount (the picture is cropped in the post). The engine is level side to side and so is the car, I don’t know why one side is higher than the other. My uprights are also exactly the same dimensionally (mirror images of each other though), is the cross member or mount holes on the engine not symmetrical?
The only rotational movement the engine will tend to have relative to the crossmember will be the amount that the torque tube flexes. How close can I get to the crossmember without having to worry about hitting it? I’m using the shorty urethane mounts.
I’m also starting to think about the wiring, I’m reading the conversion manual for the third time and focusing on the electrical side of things, but I’m still kind of nervous. Where do people send the ECU for reprogramming and how do you specify what you want done to it? Can you buy your own programmer? Also, I was thinking about making my own gauge cluster, how hard would that be? Do I need extra sensors to run each of the gauges, or can I use the sensors that are already there? It would also be nice to have an old fashion oil pressure gauge in the engine bay when I start it for the first time, is this possible?
Suggestions on the Griffin Radiator install would also be great!
Luke714- Posts : 441
Join date : 2009-12-30
Age : 33
Location : Maine
Re: My Porsche LS1 build
![]() Arthropraxis Wed Jul 14, 2010 7:29 pm
Arthropraxis Wed Jul 14, 2010 7:29 pm
Arthropraxis- Posts : 1103
Join date : 2009-09-02
Re: My Porsche LS1 build
![]() cfgioja Wed Jul 14, 2010 10:19 pm
cfgioja Wed Jul 14, 2010 10:19 pm
As far as the hood ridges, in the middle ridge I made a 2 inch by 1 inch cut to clear the throttle body corner since it was hitting. Do not remove too much or your hood will be unstable and flex alot.
Wiring and harness, there are some places you can buy aftermarket harnesses. I used Speartech, he made a nice stand alone. Painless should have one, and others. The stand alone I have has its own fuel system wired in, all you have to do is connect it to the fuel pump, so thats a plus not trying to route into the stock body setup. I prefer it over the idea of modifying an isisting harness since you never know what shape the wires and sensors are in. I prefer new stuff alot if I can afford it. Plus they have everything labelled and organized to the proper areas.
Ecu can most likely be reprogrammed at a proformance shop, I know again that speartech reprogrammed mine and moved the rev limiter to 6500 with out emissions. RH can do it too. I am sure many companies that make the harnesses ahve the capability to reprogram you ecu. You can reprogram them yourselve with the right equipment and knowledge too.
cfgioja- Posts : 804
Join date : 2009-11-22
Age : 39
Location : Clarksville, AR
Re: My Porsche LS1 build
![]() xschop Thu Jul 15, 2010 10:08 am
xschop Thu Jul 15, 2010 10:08 am
Look in my thread and see the wiring diagram for the standalone harness I got from SSP. I have less than $500 in my harness & brain reflash from SSP (Brain was $30 win off Ebay)

xschop- Posts : 2711
Join date : 2009-06-09
Location : OKC
Re: My Porsche LS1 build
![]() Luke714 Thu Jul 15, 2010 11:25 am
Luke714 Thu Jul 15, 2010 11:25 am
I think I want to modify my own harness, is that foolish and do I need any other components or is it just a matter of rewiring and clipping?
Thanks for the confirm on the hood mod, and slotting the x member sounds good. How much room can you gain from cutting the hood? How close can the oil pan come to the x member without causing problems, aka what is the max rotation of the engine relative to the x member?
Sorry for the hurried reply,
thanks again,
Luke
Luke714- Posts : 441
Join date : 2009-12-30
Age : 33
Location : Maine
Re: My Porsche LS1 build
![]() spence Thu Jul 15, 2010 12:19 pm
spence Thu Jul 15, 2010 12:19 pm
spence- Posts : 684
Join date : 2009-07-21
Age : 41
Location : St.Catharines, Ontario, Canada
Re: My Porsche LS1 build
![]() 87-944S Thu Jul 15, 2010 6:36 pm
87-944S Thu Jul 15, 2010 6:36 pm
87-944S- Posts : 744
Join date : 2009-06-10
Location : Maryland
Re: My Porsche LS1 build
![]() Luke714 Wed Jul 21, 2010 8:09 pm
Luke714 Wed Jul 21, 2010 8:09 pm
A couple of parts came in while I was gone:
SPEC “Stage 2” clutch, full Kevlar friction disk
SPEC 12lb Aluminum flywheel
GM throwout bearing
New throttle cable
[You must be registered and logged in to see this image.]
Some things I’ve ordered:
Clutch fittings and hoses
Braided SS brake lines
Brake master cylinder
19mm rebuildable ball joints and spindle machining service from Rennbay
3.5” inlet/outlet muffler
12’ of 3.5” exhaust pipe
3” inlets to 3.5” outlet y-pipe
Porsche pilot bearing
Some things I can’t find and would like some suggestions:
What have people used for a 3.5” inlet/outlet flex pipe?
A 12mm x 1.0 banjo bolt, I can’t find any banjo bolt with a 12mm x 1.0 thread???
Good Oil cooler, what do people recommend as a budget minded solution?
[You must be registered and logged in to see this link.]
or
http://www.summitracing.com/parts/PRM-401/
possibly?
I’ve kept a really detailed budget with every expense, part and receipt, I was thinking about uploading it when this project is done. This might offer a more detailed idea of how much this cost for people that are interested in a price. That seems like a pretty common question on this board.
I got the engine sitting pretty on its engine mounts at 1:30AM Saturday morning. I just ground off the tack welds on the uprights and adjusted the jig a little bit, everything is hunky dory now. I also had to make a small modification to the drivers side of the oil pan, next weekend I’ll re-weld all the pieces back onto it and make sure it’s oil tight. I think I’m just going to buy some aluminum paint for protection. Right now I have about .75” clearance between the firewall and valve cover.
[You must be registered and logged in to see this image.]
My dad surprised me with a comfortable creeper; I was just using a piece of plywood with four dollies. I almost fell asleep on this guy.
[You must be registered and logged in to see this image.]
Another step forward was my radiator fitment. I cut the flanges out of the radiator area and then got rid of the front latch crossmember all together. I was playing with the idea of making the latch member removable, but it doesn’t seem to be structural because of how it’s mounted. The nose panel also attaches to it, but seems plenty rigid without it. I decided to make my own top radiator mount anyway. The way I have things now the bottom of the radiator isn’t any lower than the stock unit was. This also opens of the interesting possibility of having the air intake right where the intercooler was before. I also cut the fan shroud enough to get it to fit onto the radiator as well. The top radiator mount also functions to mount the fans. I can modify the existing bottom radiator mount to work. That way I can remount the belly pan and such. Is that even something you can do once the V8 is in?
[You must be registered and logged in to see this image.]
Where can I find a good schematic to help me plumb the heater core, overflow tank, etc into the cooling system? I’ve never had to run the hoses in a custom setting like this so I’m not sure what to do. Any advice on this would be helpful. Do you put a solid cap on the radiator and a pressure cap on the Porsche overflow tank?
Cheers,
Luke
Luke714- Posts : 441
Join date : 2009-12-30
Age : 33
Location : Maine
Re: My Porsche LS1 build
![]() Luke714 Mon Nov 04, 2013 10:41 am
Luke714 Mon Nov 04, 2013 10:41 am
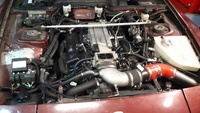
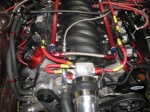
Most recently I put together a new intake I thought I'd throw up a picture of, thanks to pormgb for giving me the info on the intake. I used a K&N 63-3073 FIPK and a heat gun to slightly warp the ducting to fit under the hood an nose panel. It GREATLY improved my highly restrictive 90+ deg elbow, gave me nice cold air instead of hot stuff straight off the headers, and increased my filter area.
old:
[You must be registered and logged in to see this image.]
new:
[You must be registered and logged in to see this image.]
Luke714- Posts : 441
Join date : 2009-12-30
Age : 33
Location : Maine
Re: My Porsche LS1 build
![]() Luke714 Thu May 08, 2014 6:32 pm
Luke714 Thu May 08, 2014 6:32 pm
Front Wheels/Tires:
-255/40R17 Nitto NT555
-ZR1 17”x9.5”, 56mm offset
-5x120.65 bolt pattern
-Final Offset with adapters/spacers: 35mm
-.827” 21mm spacers from Motorsport Tech with a 5x130mm to 5x120.65mm bolt pattern conversion
-Minor fender rolling, setup might work without any at all
Rear Wheels/Tires:
-315/35R17 Nitto NT555
-ZR1 17”x11”, 50mm offset, 5x120.65 bolt pattern
-Final Offset with adapters/spacers: 35mm
-.591”, 15mm spacers from Motorsport Tech with a 5x130mm to 5x120.65mm bolt pattern conversion
-Fender lip rolled
I can't say enough good things about Motorsport Tech, their spacers are really good quality and fit snugly.
Here is a photo of the new tires:
[You must be registered and logged in to see this image.]
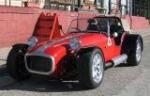
Here is a photo of the car with old tires (Khumo 295's), but same wheels:
[You must be registered and logged in to see this image.]
The old tires were discontinued, so I had to fit 315's instead of 295's. It turned out well though, the Nitto's were cheaper, better in the rain, and had a 300 instead of 180 tread wear which meant I can keep them on the car longer than a summer.
The de-powered rack was too heavy and come to find out you can't just disconnect the hydraulic lines... There is a slender shaft between the intermediate shaft engagement and the pinion.
[You must be registered and logged in to see this image.]
Instead of making the 944 power rack rigid I decided to go with a 924 manual rack. This would lighten the effort need to steer and best of all, remove the extremely loose feeling front end cause by the twisting of the shaft on the 944 power rack. I went with a 924 rack because I couldn't find a 944 manual rack in left hand steering.
To get the 924 rack to fit I had to do some modifications. I thought at first I might be able to just use the 944 power rack in the 924 housing, but the rake on the teeth is different, even if the pitch is the same. The power rack is on top.
[You must be registered and logged in to see this image.]
The overall length difference between racks was .375 in (944 power rack was longer). However, I had more than enough adjustment left in my outer tie rod ends for .1875 in on both ends.
[You must be registered and logged in to see this image.]
You can see here the relative size of the pinions. The ratio for the 924 rack is 119mm for 3.5 turns, the old 944 power rack was 133mm for 3.5 turns. (source: [You must be registered and logged in to see this link.]
[You must be registered and logged in to see this image.]
The mounting between the 924 rack and the 944 rack is different. The mounts on the 924 unit are solid, whereas there are the rubber bushings on the 944. The 924 mounting points are closer together as well. Below is what I used for a bolt pattern conversion.
[You must be registered and logged in to see this image.]
Also, to keep the centerline of the 924 rack the same in the forward/rear direction even after I added an adapter plate I had to cut the protrusions off the crossmember and shave 1/8" off the 924 rack. Even with the nubs cut off the crossmember, there was still close to 1/2" of aluminum to tap into.
[You must be registered and logged in to see this image.]
Essentially I made two 1/4" steel adapter plates that I bolted to the crossmember with grade 8 10mm flat head machine screws (the same ones used to hold the engine mount adapter plates to the engine). The 924 rack then bolted to these plates with the same bolts that were used on the old 944 power rack. The underside of the car is filthy in this picture from grinding. That wire in the second picture is also not normally hanging.
[You must be registered and logged in to see this image.]
The other issue is that the manual racks were made for female inner tie rod joints and the power racks all had male inner tie rod joints. I essentially drilled and tapped the ends of the manual rack. It took a 14mmx1.5 tap (an oddball).
[You must be registered and logged in to see this image.]
To keep the new male inner tie rod joints from backing out, and also to act as stops on the end of the rack I cut up the old female inner tie rod ends.
[You must be registered and logged in to see this image.]
In order to get the same travel as the 944 power rack I cut the stopper nuts such that the length of the large diameter was .350 in.
Lastly, I lengthened the intermediate shaft that came with the 924 manual rack by .675 in.
[You must be registered and logged in to see this image.]
All greased up, painted, and with new boots ready for installation
[You must be registered and logged in to see this image.]
All in all I couldn't be happier with the steering feel. The car is very responsive, parking is less painful, and the dog doesn't walk the person around truck ruts anymore.
I also braced the firewall and increased the pedal ratio on my manual brake master cylinder. I now actually really like the brake feel and can lock up the big 315's. I was thinking about going to an ABS power brake setup until now.
[You must be registered and logged in to see this image.]
Luke714- Posts : 441
Join date : 2009-12-30
Age : 33
Location : Maine

acorad- Posts : 697
Join date : 2010-12-21
Location : Agoura Hills, CA
Re: My Porsche LS1 build
![]() Luke714 Fri May 09, 2014 11:56 am
Luke714 Fri May 09, 2014 11:56 am
acorad wrote:Wow.
Andy
Thanks! The 924 rack was one of the more rewarding bits of fab I've had to do on this conversion. I'm sure it's been done a whole lot, but I didn't find a writeup.
Cheers,
Luke
Luke714- Posts : 441
Join date : 2009-12-30
Age : 33
Location : Maine
Re: My Porsche LS1 build
![]() Luke714 Thu Jun 05, 2014 9:57 pm
Luke714 Thu Jun 05, 2014 9:57 pm
Cheers
[You must be registered and logged in to see this image.]
Luke714- Posts : 441
Join date : 2009-12-30
Age : 33
Location : Maine
Re: My Porsche LS1 build
![]() chadfjones Sat Jun 07, 2014 11:38 pm
chadfjones Sat Jun 07, 2014 11:38 pm
I've heard that mustang dyno's are usually generous with they're numbers though.
chadfjones- Posts : 13
Join date : 2011-04-03
Location : SF Bay Area, CA
Re: My Porsche LS1 build
![]() Lemming Sun Jun 08, 2014 8:52 am
Lemming Sun Jun 08, 2014 8:52 am
chadfjones wrote:
I've heard that mustang dyno's are usually generous with they're numbers though.
Just the opposite, they are typically lower than a Dynojet.
Great numbers for a stocker.

Lemming- Posts : 855
Join date : 2011-05-30
Location : B'ham
Re: My Porsche LS1 build
![]() Arthropraxis Sun Jun 08, 2014 9:39 am
Arthropraxis Sun Jun 08, 2014 9:39 am
Do you have pictures of the firewall brace installed? What size F/R MC and what ratio are you using for your brake pedal. Awesome skills, BTW.
Arthropraxis- Posts : 1103
Join date : 2009-09-02
Re: My Porsche LS1 build
![]() Luke714 Fri Apr 06, 2018 12:30 pm
Luke714 Fri Apr 06, 2018 12:30 pm
I noticed that photobucket has messed all the pictures up, which is a shame, but seems to be happening all over the web. I have since made a Facebook page with lots of info on my build. I put the page together while I'm in the process of selling the car, but I hope to keep to online indefinitely as a resource. In the photos section of the page there are a few images of the ledger with all the costs and part numbers.
[You must be registered and logged in to see this link.]
Thanks guys for all the support over the years, I wouldn't have been able to do it without you!
Best,
Luke
P.S.
Arthropraxis wrote:Do you have pictures of the firewall brace installed? What size F/R MC and what ratio are you using for your brake pedal. Awesome skills, BTW.
There are photos on the FB page, the MC is a Wilwood 260-7563 1” Bore, 1.1” Stroke, the clutch MC is aTilton 75-875U .875” bore, 1.1” stroke. I'm not sure what the exact pedal ratio ended up being
Luke714- Posts : 441
Join date : 2009-12-30
Age : 33
Location : Maine
Re: My Porsche LS1 build
![]() Rakestraw89 Sat Apr 07, 2018 2:54 pm
Rakestraw89 Sat Apr 07, 2018 2:54 pm
Rakestraw89- Posts : 9
Join date : 2018-04-04
Page 4 of 5 • 1, 2, 3, 4, 5 ![]()
» LSX Porsche 968 having fun with 993 C4 and Porsche 930 at race track
» New guy new build
» LEAKING TPC HYDROBOOST
» Fesler Saratoga Top
» Parts availability for general maintenance?
» What coilover spring rates are you running with torsion bar removed?
» 944 Turbo TPC Radiator Install Help Needed
» HYDRAULIC THROWOUT/RELEASE BEARING NOT ENGAGING FULLY
» Best engine uprights/plates
» Rear coilover suspension setup
» Ray's 1987 944 LS1 Build & Swap