
 Latest images
Mon Jul 08, 2013 1:56 pm by Admin
For the benefit of 944Hybrids users there are two search functions available for you to use.
The purpose of this sticky is to explain the "Advanced Search" function because it is much more powerful and is the best choice when researching information.
When you log on to the site a list of options is shown in a line at the top of the page. One option is labelled "Search", use this option (NOT the search box lower down on the right).
After you click on the upper search option, a drop down box appears. At the bottom of this box is a radio button marked "Advanced …
Comments: 0
Garage queens
Page 1 of 2 • 1, 2 ![]()

Garage queens
![]() gdopnt Wed Feb 27, 2013 8:08 pm
gdopnt Wed Feb 27, 2013 8:08 pm
[You must be registered and logged in to see this image.]
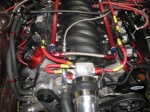
This one is a good running, good shape and wanted to leave it alone.
[You must be registered and logged in to see this image.]
Last edited by gdopnt on Wed Dec 02, 2015 9:21 pm; edited 8 times in total
gdopnt- Posts : 127
Join date : 2012-11-12
Location : Rockford, Illinois
smkn951 likes this post
Re: Garage queens
![]() 87-944S Wed Feb 27, 2013 8:29 pm
87-944S Wed Feb 27, 2013 8:29 pm
87-944S- Posts : 744
Join date : 2009-06-10
Location : Maryland
Re: Garage queens
![]() jws Thu Feb 28, 2013 8:36 am
jws Thu Feb 28, 2013 8:36 am
Last edited by jws on Thu Feb 28, 2013 8:37 am; edited 2 times in total
jws- Posts : 37
Join date : 2011-01-23
Motor is out
![]() gdopnt Wed Mar 06, 2013 1:25 pm
gdopnt Wed Mar 06, 2013 1:25 pm
[You must be registered and logged in to see this image.]
gdopnt- Posts : 127
Join date : 2012-11-12
Location : Rockford, Illinois
smkn951 likes this post
torque tube shaft
![]() gdopnt Thu Mar 07, 2013 8:16 pm
gdopnt Thu Mar 07, 2013 8:16 pm
gdopnt- Posts : 127
Join date : 2012-11-12
Location : Rockford, Illinois
Re: Garage queens
![]() gdopnt Wed Apr 10, 2013 7:05 pm
gdopnt Wed Apr 10, 2013 7:05 pm
[You must be registered and logged in to see this image.]
The cross member was trimmed a little for clearance. the oil pan needed a rubber mallet on the inside of the pan to clear the tray.
[You must be registered and logged in to see this image.][/url
Sorry no fly wheel bolts , they have become slow to get because there metric
[You must be registered and logged in to see this image.][/u
Last edited by gdopnt on Wed Apr 10, 2013 8:06 pm; edited 1 time in total
gdopnt- Posts : 127
Join date : 2012-11-12
Location : Rockford, Illinois
First test fit
![]() gdopnt Wed Apr 10, 2013 7:37 pm
gdopnt Wed Apr 10, 2013 7:37 pm
[You must be registered and logged in to see this image.]
gdopnt- Posts : 127
Join date : 2012-11-12
Location : Rockford, Illinois
shaft to bearing
![]() gdopnt Wed Apr 10, 2013 8:03 pm
gdopnt Wed Apr 10, 2013 8:03 pm
[You must be registered and logged in to see this image.]
And the purpose for my test fit. Adjusting the shaft was not so hard. [You must be registered and logged in to see this image.]
Next thing is to pull it all out!
gdopnt- Posts : 127
Join date : 2012-11-12
Location : Rockford, Illinois

Porch- Posts : 851
Join date : 2009-09-02
Age : 42
Re: Garage queens
![]() gdopnt Mon Apr 15, 2013 5:34 pm
gdopnt Mon Apr 15, 2013 5:34 pm
[You must be registered and logged in to see this image.]
gdopnt- Posts : 127
Join date : 2012-11-12
Location : Rockford, Illinois
Re: Garage queens
![]() Admin Mon Apr 15, 2013 6:17 pm
Admin Mon Apr 15, 2013 6:17 pm
What part did you have to move with a rubber mallet?
I test fit/build these pans on a LS1 motor with a full windage tray in place as well as I build them without a gasket in place so they will have a little more room once the are installed on the motor permanently.
Admin- Admin

- Posts : 1448
Join date : 2009-06-08
Age : 65
Location : Arlington,Texas -

Re: Garage queens
![]() gdopnt Mon Apr 15, 2013 8:26 pm
gdopnt Mon Apr 15, 2013 8:26 pm
[You must be registered and logged in to see this image.]
The extended bolts that were sent for the cross member are the wrong size, the black which were sent are 1.75 and the silver ( i only have two so far) are 1.50 thread pitch.
[You must be registered and logged in to see this image.]
Little things really kinda like the block off plate walking away with the stock oil pan I sold.
gdopnt- Posts : 127
Join date : 2012-11-12
Location : Rockford, Illinois
Re: Garage queens
![]() Admin Wed Apr 17, 2013 7:58 am
Admin Wed Apr 17, 2013 7:58 am
Admin- Admin
- Posts : 1448
Join date : 2009-06-08
Age : 65
Location : Arlington,Texas -
Engine bay paint
![]() gdopnt Mon May 27, 2013 4:32 pm
gdopnt Mon May 27, 2013 4:32 pm
[You must be registered and logged in to see this image.]
gdopnt- Posts : 127
Join date : 2012-11-12
Location : Rockford, Illinois
Garage queens update
![]() gdopnt Tue Aug 13, 2013 7:46 pm
gdopnt Tue Aug 13, 2013 7:46 pm
[You must be registered and logged in to see this image.]
A new double roller chain. New SLP oil pump this pump is made to be in front of the double chain no shims
[You must be registered and logged in to see this image.]
The oil pick up tube mount did touch the cam cover
[You must be registered and logged in to see this image.]
Less than 2 minutes grinding to correct
[You must be registered and logged in to see this image.]
gdopnt- Posts : 127
Join date : 2012-11-12
Location : Rockford, Illinois
Garage queens update
![]() gdopnt Tue Aug 13, 2013 8:39 pm
gdopnt Tue Aug 13, 2013 8:39 pm
[You must be registered and logged in to see this image.]
The back side of the oil pump
[You must be registered and logged in to see this image.]
The LS6 PCV valley cover
[You must be registered and logged in to see this image.]
I had the bolt holes line board up 1/2 inch and then a plate welded in on all four sides. They opened 1mm from welding but that can't be all too bad because they did not just slide in being raised. Longer bolts will be needed. The rear A arm spacers will not be installed.
[You must be registered and logged in to see this image.]
Clearenced in the rear for the A arm because I raised A arm mount holes up. I cut the same angle 1/2 up.
[You must be registered and logged in to see this image.]
2000 Ford hydroboost with TPC mount plate with the rod threaded for the porsche bracket. Although I have not cut off the one side of the fork for those who look close.
[You must be registered and logged in to see this image.]
I purchased a PAINLESS harness and have a camaro ecm also ordered TCP long tube headers.
BTW- Thank you Eric for all the help and parts
gdopnt- Posts : 127
Join date : 2012-11-12
Location : Rockford, Illinois
Remote bleeder
![]() gdopnt Sat Aug 24, 2013 6:33 pm
gdopnt Sat Aug 24, 2013 6:33 pm
[You must be registered and logged in to see this image.]
Found it better to drop the motor down on the creeper and I didnt have to raise the car any more than where it was. Pushed right through the fender well.
[You must be registered and logged in to see this image.]
Motor finally back in
[You must be registered and logged in to see this image.]
Also installed hydroboost
[You must be registered and logged in to see this image.]
gdopnt- Posts : 127
Join date : 2012-11-12
Location : Rockford, Illinois
Headers
![]() gdopnt Wed Aug 28, 2013 7:40 pm
gdopnt Wed Aug 28, 2013 7:40 pm
[You must be registered and logged in to see this image.]
Just as easy to install as any thing else.
[You must be registered and logged in to see this image.]
gdopnt- Posts : 127
Join date : 2012-11-12
Location : Rockford, Illinois

RobotMachines- Posts : 165
Join date : 2009-08-09
Location : Connecticut
Steering shaft
![]() gdopnt Wed Sep 18, 2013 6:52 pm
gdopnt Wed Sep 18, 2013 6:52 pm
[You must be registered and logged in to see this image.]
Drilled and taped with allen heads for test fit.
[You must be registered and logged in to see this image.]
After a test fit it was welded.
[You must be registered and logged in to see this image.]
Hardened pins were inserted and welded in.
[You must be registered and logged in to see this image.]
gdopnt- Posts : 127
Join date : 2012-11-12
Location : Rockford, Illinois
Upright bolt and steering shaft
![]() gdopnt Wed Sep 18, 2013 8:13 pm
gdopnt Wed Sep 18, 2013 8:13 pm
[You must be registered and logged in to see this image.]
gdopnt- Posts : 127
Join date : 2012-11-12
Location : Rockford, Illinois
Steering shaft length
![]() simon123 Fri Sep 20, 2013 4:49 am
simon123 Fri Sep 20, 2013 4:49 am
When I worked with Xschop on my steering shaft we found that the length should be increased by an amount LESS than the amount you drop the cross member.
Imagine the steering shaft to be the hypotenuse of a right triangle, the perpendicular is the dimension that increases when you drop the cross member, therefore the hypotenuse will increase some amount less than the drop. Can't remember exactly the amount used but I believe we settled on 1/2" extension for a 3/4" cross member drop.
Don't forget to retain the U joint clocking.
simon123- Posts : 125
Join date : 2013-07-25
Re: Garage queens
![]() 944convert Fri Sep 20, 2013 5:20 am
944convert Fri Sep 20, 2013 5:20 am
That's what Rob says here:simon123 wrote: but I believe we settled on 1/2" extension for a 3/4" cross member drop.
Don't forget to retain the U joint clocking.
[You must be registered and logged in to see this link.]
.
944convert- Posts : 253
Join date : 2009-10-25
Re: Garage queens
![]() gdopnt Fri Sep 20, 2013 9:26 pm
gdopnt Fri Sep 20, 2013 9:26 pm
[You must be registered and logged in to see this image.]
gdopnt- Posts : 127
Join date : 2012-11-12
Location : Rockford, Illinois
Still moving
![]() gdopnt Mon Jan 06, 2014 8:24 pm
gdopnt Mon Jan 06, 2014 8:24 pm
gdopnt- Posts : 127
Join date : 2012-11-12
Location : Rockford, Illinois
Page 1 of 2 • 1, 2 ![]()
» S&P Headers arrive at the 7E garage
» I just bought DVC's 944... AND NOW I DROWNED IT IN A FLASH FLOOD... And now the rebuild starts!!!
» Best engine uprights/plates
» LEAKING TPC HYDROBOOST
» HYDRAULIC THROWOUT/RELEASE BEARING NOT ENGAGING FULLY
» Fesler Saratoga Top
» Ray's 1987 944 LS1 Build & Swap
» LS 982 5speed project here
» LT1 Spark Plug make and model
» 928 5-speed kit
» Slave Cylinder Spacing from Clutch Fingers