
 Latest images
Mon Jul 08, 2013 3:56 pm by Admin
For the benefit of 944Hybrids users there are two search functions available for you to use.
The purpose of this sticky is to explain the "Advanced Search" function because it is much more powerful and is the best choice when researching information.
When you log on to the site a list of options is shown in a line at the top of the page. One option is labelled "Search", use this option (NOT the search box lower down on the right).
After you click on the upper search option, a drop down box appears. At the bottom of this box is a radio button marked "Advanced …
Comments: 0
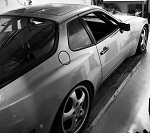
S2 to LS1 conversion

S2 to LS1 conversion
![]() kachunk Thu May 24, 2012 8:17 pm
kachunk Thu May 24, 2012 8:17 pm
[You must be registered and logged in to see this image.]
Its in the initial stages, still gathering a lot of parts, ideas, learning a lot!
I found a donor 2000 F-body LS1 with wiring that is currently being refreshed. Engine had 80k miles on it, was supposedly inspected by seller, but he didn't have documentation. I received it disassembled. Engine shop is cleaning, checking tolerances and installing new bearings. I've got a cam ordered from EPS to give it a kick in the pants. Also planning an LS6 intake.
I am considering installing the heads/valvetrain myself, but a little nervous about the risk of screwing something up. I consider myself an amateur mechanic at best.
[You must be registered and logged in to see this image.]
Looking forward to learning alot and getting this thing together. My initial target is to get it roadworthy by next summer. I'll be asking dumb questions and making mistakes, but there is a wealth of knowledge on this site to help guide me!
So that I'm not flooding this thread with unnecessary pics, I will post additional pics in my photobucket album here:
FULL ALBUM
Last edited by kachunk on Thu Jan 17, 2013 9:25 pm; edited 3 times in total (Reason for editing : added link to full album)

kachunk- Posts : 23
Join date : 2012-04-06
Location : MI
welcome
![]() kevin924kevin Thu May 24, 2012 8:55 pm
kevin924kevin Thu May 24, 2012 8:55 pm

kevin924kevin- Posts : 927
Join date : 2011-02-03
Age : 60
Location : Canada
Re: S2 to LS1 conversion
![]() Lemming Thu May 24, 2012 9:00 pm
Lemming Thu May 24, 2012 9:00 pm

Lemming- Posts : 855
Join date : 2011-05-30
Location : B'ham
Re: S2 to LS1 conversion
![]() kachunk Mon Jun 04, 2012 9:39 pm
kachunk Mon Jun 04, 2012 9:39 pm
[You must be registered and logged in to see this image.]
Here is the motorcycle lift I used to lower the engine out
[You must be registered and logged in to see this image.]
This is how high the front was lifted. Taken from across the hood of my Dodge Ram....
[You must be registered and logged in to see this image.]
So the entire drivetrain is out. I'm still gathering LS1 parts. and cleaning up the engine compartment...
kachunk- Posts : 23
Join date : 2012-04-06
Location : MI
Rich L.- Posts : 928
Join date : 2011-05-30
Location : Seattle
Re: S2 to LS1 conversion
![]() Rich L. Tue Jun 05, 2012 4:32 pm
Rich L. Tue Jun 05, 2012 4:32 pm
Rich
Rich L.- Posts : 928
Join date : 2011-05-30
Location : Seattle
Re: S2 to LS1 conversion
![]() kachunk Tue Jun 19, 2012 6:33 pm
kachunk Tue Jun 19, 2012 6:33 pm
I have most of the 944 engine harness out of the car. Can someone confirm if I need to pull the front harness that goes from the connector at the firewall to the dirvers headlight area? Or does that stay? I have a Camaro harness to go in.
I'm also working on rebuilding the calipers. Sent the fronts for rebuild through Rockauto. I'll post how it turns out. Bit of a gamble, they weren't in terrible shape, but for the price, I'll give it a shot! I had noticed the rears were sticking a little bit occasionally. Doing the rear caliper seals and dust boots myself, because there is no rebuild service available. Planning a nice powderocat finish when the work is done. Still debating the color, leaning towards red.
Pelican DOT braided stainless flexhoses now installed, but I broke the hard line to the drivers rear caliper in the process. Ugh, thats an expensive piece of tube (pelican)

Knock on wood, but its only the second thing I've broken so far....
[You must be registered and logged in to see this image.]
Last edited by kachunk on Tue Jun 19, 2012 8:54 pm; edited 1 time in total
kachunk- Posts : 23
Join date : 2012-04-06
Location : MI
Re: S2 to LS1 conversion
![]() skywalker01 Tue Jun 19, 2012 7:07 pm
skywalker01 Tue Jun 19, 2012 7:07 pm

skywalker01- Posts : 477
Join date : 2009-07-22
Age : 60
Re: S2 to LS1 conversion
![]() 944-LT1 Wed Jun 20, 2012 4:42 am
944-LT1 Wed Jun 20, 2012 4:42 am
kachunk wrote:I have most of the 944 engine harness out of the car. Can someone confirm if I need to pull the front harness that goes from the connector at the firewall to the dirvers headlight area? Or does that stay? I have a Camaro harness to go in.
Welcome....sorry Im late.
That harness (from firewall to headlight area) is for the headlights/fog lights/etc. I wouldnt pull that out. The camaro harness is just to power the engine yes? So, it should stay.
_________________
[You must be registered and logged in to see this image.]
[You must be registered and logged in to see this link.]

944-LT1- Moderator

- Posts : 1265
Join date : 2009-06-09
Age : 102
Location : NOTRE DAME
Re: S2 to LS1 conversion
![]() kachunk Mon Jul 16, 2012 10:15 pm
kachunk Mon Jul 16, 2012 10:15 pm
Got the braker booster removed.
That was the most twisted position I've ever been in while working on a car!
Still having trouble disconnecting the slave cylinder pin from the back of the pedal. I got the clip removed, but there doesn't seem to be enough room to slide the pin out of the slot.
I purchased a hydroboost setup from a 2000 Mustang. Got the 944 clevis threaded on with no problem.
I've insulated the drivers side framerail with thermotec adhesive backed insulation. I bought the 12x24 size and used about 99% of it.
[You must be registered and logged in to see this image.]
Cardone retruned my calipers saying that they didn't have the parts available to rebuild them. So that was a waste of time, but they did refund my money. So I got seal kits from Karl at Racer's Edge. He's been great to work with.
[You must be registered and logged in to see this image.]
I'm still debating what color to have the calipers powdercoated. I'm leaning towards a titanium color (silver/gold/pewter). I think it would look good with red Porsche lettering. I ordered some free swatches from Prismatic to help me decide. Something like this example?
[You must be registered and logged in to see this image.]
For sandblasting, I'm protecting the new seals using threaded rod, some big washers and nuts.
I will emphasize to the coater to be careful around those areas.
[You must be registered and logged in to see this image.]
I'm also touching some paint on the passenger framerail that got scratched through the primer when I removed the old engine.
And I'm now tackling the 5th gear swap for my recently acquired 9U turbo trans.
kachunk- Posts : 23
Join date : 2012-04-06
Location : MI
Re: S2 to LS1 conversion
![]() kachunk Sun Sep 16, 2012 9:14 pm
kachunk Sun Sep 16, 2012 9:14 pm
Got the calipers powdercoated with a Prismatic Powders color PMB 1214 Dark Titanium. I 'm pretty happy with it. It looks like it has a little pearl in it, but its a nice deep "champagney" gold. Thought I had a local source to do the work, but it fell through. Wound up working with "Its Not Paint" in Huntsville, Al. Jese there does great work.
[You must be registered and logged in to see this image.]
"Porsche" lettering stencil is on the way, the lettering will be red.
Here is some updates with the engine. Had the heads milled 0.010 just to clean up the sealing surface. Cleaned all the carbon out of the ports and combustion chamber with Mopar combustion chamber cleaner. Soaked the valves in it for a few hours to help clean the crap off. After inspection I felt I could get away without a valve job. However, the exhaust valves felt like 120 grit sand paper, so I did ante up for a new set. Ferrea 6232 were affordable and met my expectations for a near stock valve. Once I got them I realized the face is not as dished as the stock valves. It probably helps compression a tad, but I'm not sure about flow....
I hand lapped the intake and the new exhaust valves, and I'm happy with the results. I used medium then fine grit, and I think it is going to seal well now.
Intake before and after:
[You must be registered and logged in to see this image.]
Note the new valve face is not as "dished" as the OEM valve. Any thoughts? Weight was only 2 grams heavier....
[You must be registered and logged in to see this image.]
exhaust valve seat before lapping:
[You must be registered and logged in to see this image.]
After lapping:
[You must be registered and logged in to see this image.]
End result:
[You must be registered and logged in to see this image.]
I am going to measure the combustion chamber volume to see if I could benefit from a Cometic thin head gasket. I'll knock it out this week.
Have the clutch fittings all together now.
I will post up some pics of my hydroboost mount as soon as I can.
Been very busy with social commitments this summer. Its been keeping me from my precious....
Last edited by kachunk on Wed Jan 23, 2013 7:35 pm; edited 3 times in total (Reason for editing : removed redundant pic)
kachunk- Posts : 23
Join date : 2012-04-06
Location : MI
Re: S2 to LS1 conversion
![]() the951racer Mon Sep 17, 2012 11:20 am
the951racer Mon Sep 17, 2012 11:20 am
the951racer- Posts : 135
Join date : 2012-01-11
Age : 40
Location : Madison, MS
Re: S2 to LS1 conversion
![]() kachunk Tue Nov 20, 2012 11:29 pm
kachunk Tue Nov 20, 2012 11:29 pm
I had period correct stencils made to fit the calipers. I could not find ANY of the correct stencils or decals anywhere. There were none available in the market place (Porsche patent infringement?) . I felt a little uncomfortable paying for developing new stencils, but the shop was willing to work with me in a big way. In the big scheme of things, maybe it helps out another guy like me working on his car, so I sucked it up and got it done. There is now a shop in SE MI that has a pattern that is near identical to the stock late 80's "PORSCHE" font on the cheap....
Link to Rennlist thread
[You must be registered and logged in to see this image.]
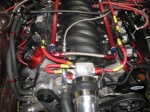
Finally got the shortblock back from the machinist. Looks good. I was frustrated with the amount of time it took, but it looks like everything was done correctly/completely. Although not requested, ARP bolts were used for the rods and crank mains. I'm not going to be making extreme HP, but everything is clean and ready to go.
[You must be registered and logged in to see this image.]
The cam was degreed in, it measured just as advertised with +2 advance ground in.
EPS grind .596/.598 222/226 with 113 LSA +2
I finished assembling the longblock with Cometic 0.40 head gaskets, PAC beehive springs, comp cams trunion upgrade, c5 windage tray (clearanced slightly at oil tube pickup tube), TPC oil pan, LS6 valley cover (ground my LS1 block to fit it), new knock sensors, lifter guides, valve stem seals all the rest...
[You must be registered and logged in to see this image.]
Last edited by kachunk on Fri Jan 25, 2013 11:20 pm; edited 2 times in total (Reason for editing : link PORSCHE font thread)
kachunk- Posts : 23
Join date : 2012-04-06
Location : MI
Re: S2 to LS1 conversion
![]() kachunk Tue Nov 20, 2012 11:41 pm
kachunk Tue Nov 20, 2012 11:41 pm
[You must be registered and logged in to see this image.]
Last edited by kachunk on Thu Jan 17, 2013 8:19 pm; edited 1 time in total (Reason for editing : Removed redundant pic)
kachunk- Posts : 23
Join date : 2012-04-06
Location : MI
Re: S2 to LS1 conversion
![]() kachunk Thu Jan 17, 2013 9:14 pm
kachunk Thu Jan 17, 2013 9:14 pm
I kept looking are the rear suspension on the ground, I finally bit the bullet and updated it. Spent a fortune but made improvements while its convenient.
Polybronze springplate bushings, sport hardness trailing arm bushings, solid torsion carrier mounts, 28mm torsion bars. My wallet is crying, but it needed to be done (160k miles on the original parts). The springplate bushings were visibly sagging. New torsion bars will balance the previously installed 250 lb springs in the front. Had the spring plates and fasteners replated at a local plater. Had the torsion tube carriers and engine cross member anodized clear to keep them from getting all crusty from galvanic corrosion. The combination of the 3.0L oil cooler housing leak and Michigan/PA roads resulted in a coating of yellow crusty residue on every surface of the passenger undercarriage. Ugh.
Before:
[You must be registered and logged in to see this image.]
After:
[You must be registered and logged in to see this image.]
Working on installing Bosch 044 fuel pump and Corvette filter/regulator near the fuel tank now. Then I can get the trans/torque tube mocked up for the engine install.
kachunk- Posts : 23
Join date : 2012-04-06
Location : MI
Re: S2 to LS1 conversion
![]() kachunk Thu May 09, 2013 10:45 pm
kachunk Thu May 09, 2013 10:45 pm
Completed:
- New fuel pump and filter/regulator installed and plumbed - added clearance in fuel pump cover for longer Bosch pump w/ fittings. Fuel line plumbed into engine compartment.
- Rear suspension rebuilt and installed - incl shift linkage w/ XSchop short shifter. Everything lined up great and feels tight. New EMPI axles/cv joints installed. New parking brake shoes. TPC VSS kit.
- Engine mocked up - slotted cross member at upright stud holes 1/4" due to trans mount shifting everything rearward. Tons of room in front of the engine now. Hoping control arm install is not affected....
Here's how I installed it:
Hung the engine from hoist and bolted the engine w/ bellhousing to the adapter plate (already installed onto TT). Then loosely bolted up the cross member to the uprights. Then I tightened the xmember to the chassis, then uprights to xmember. It took some shifting and patience. The engine is also lining up tight to the drivers side (firewall). I'm not 100% happy with it, but it is IN! Still messin w it.
[You must be registered and logged in to see this image.]
Picture taken from top of engine down onto drivers side bellhousing:
[You must be registered and logged in to see this image.]
kachunk- Posts : 23
Join date : 2012-04-06
Location : MI
Re: S2 to LS1 conversion
![]() Admin Fri May 10, 2013 7:10 am
Admin Fri May 10, 2013 7:10 am
Admin- Admin

- Posts : 1448
Join date : 2009-06-08
Age : 65
Location : Arlington,Texas -

Re: S2 to LS1 conversion
![]() kachunk Thu Aug 01, 2013 7:18 pm
kachunk Thu Aug 01, 2013 7:18 pm
[You must be registered and logged in to see this image.]
kachunk- Posts : 23
Join date : 2012-04-06
Location : MI
wish i could do that...
![]() Gutterboy Fri Aug 02, 2013 12:17 pm
Gutterboy Fri Aug 02, 2013 12:17 pm
My canadian locale forces me jump in on the learning experience on this endeavour!
One thing's for sure i'd be screwed without this forum.

Gutterboy- Posts : 230
Join date : 2013-05-31
Age : 44
Location : calgary, AB
Re: S2 to LS1 conversion
![]() the951racer Sat Aug 17, 2013 6:44 pm
the951racer Sat Aug 17, 2013 6:44 pm
the951racer- Posts : 135
Join date : 2012-01-11
Age : 40
Location : Madison, MS
Re: S2 to LS1 conversion
![]() 87-944S Sat Aug 17, 2013 10:40 pm
87-944S Sat Aug 17, 2013 10:40 pm
87-944S- Posts : 744
Join date : 2009-06-10
Location : Maryland
» 944 Turbo TPC Radiator Install Help Needed
» Rear coilover suspension setup
» Best engine uprights/plates
» LEAKING TPC HYDROBOOST
» HYDRAULIC THROWOUT/RELEASE BEARING NOT ENGAGING FULLY
» Ray's 1987 944 LS1 Build & Swap
» LS 982 5speed project here
» LT1 Spark Plug make and model
» 928 5-speed kit