
 Latest images
Mon Jul 08, 2013 3:56 pm by Admin
For the benefit of 944Hybrids users there are two search functions available for you to use.
The purpose of this sticky is to explain the "Advanced Search" function because it is much more powerful and is the best choice when researching information.
When you log on to the site a list of options is shown in a line at the top of the page. One option is labelled "Search", use this option (NOT the search box lower down on the right).
After you click on the upper search option, a drop down box appears. At the bottom of this box is a radio button marked "Advanced …
Comments: 0
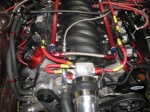
Car lift installed, now the real work will begin.
Page 4 of 6 •  1, 2, 3, 4, 5, 6
 ![]()
Re: Car lift installed, now the real work will begin.
![]() xschop Mon Feb 20, 2012 1:11 pm
xschop Mon Feb 20, 2012 1:11 pm
Last edited by xschop on Mon Feb 20, 2012 2:02 pm; edited 1 time in total

xschop- Posts : 2711
Join date : 2009-06-09
Location : OKC
Adaptor
![]() fliermike45 Mon Feb 20, 2012 1:14 pm
fliermike45 Mon Feb 20, 2012 1:14 pm
Did you make sloan's adaptor plates, this is making me nervous?
Mike
fliermike45- Posts : 778
Join date : 2009-09-19
Re: Car lift installed, now the real work will begin.
![]() acorad Mon Feb 20, 2012 1:26 pm
acorad Mon Feb 20, 2012 1:26 pm
The shaft tip is supposed to be a press fit into the pilot bearing? Or a slip fit?xschop wrote:There should be ZERO slop between pilot bearing I.D. and Shaft O.D. and the shaft O.D. should be 15mm very with little wear. A roller bearing ensures very little wear over the service life of the shaft. Looks Grenade Hybrids strikes again. The adapter plate being out of concentric will cause this severe wear. You are lucky you have a tip.

acorad- Posts : 697
Join date : 2010-12-21
Location : Agoura Hills, CA
Re: Car lift installed, now the real work will begin.
![]() acorad Mon Feb 20, 2012 1:39 pm
acorad Mon Feb 20, 2012 1:39 pm
I think I'm gonna walk away from this for the rest of the day...
acorad- Posts : 697
Join date : 2010-12-21
Location : Agoura Hills, CA
Re: Car lift installed, now the real work will begin.
![]() acorad Mon Feb 20, 2012 1:50 pm
acorad Mon Feb 20, 2012 1:50 pm
acorad- Posts : 697
Join date : 2010-12-21
Location : Agoura Hills, CA
Re: Car lift installed, now the real work will begin.
![]() xschop Mon Feb 20, 2012 1:59 pm
xschop Mon Feb 20, 2012 1:59 pm
And the protruding Pilot bearing into the rear disc hub will cause issues and more increasingly as the disc wears and migrates more towards the Pilot bearing. The extra stress will rip the spring seat areas first on the disc.
xschop- Posts : 2711
Join date : 2009-06-09
Location : OKC
Re: Car lift installed, now the real work will begin.
![]() acorad Mon Feb 20, 2012 9:33 pm
acorad Mon Feb 20, 2012 9:33 pm
I'm not sure a worn drive shaft tip is conclusive evidence that the RH adapter plate is (always) to blame.
Here's a quote from Constantine's website, obviously the drive shafts he's seeing are almost never used in conjunction with any kind of hybrid adapter plate, so it would seem that nub/shaft end wear is something that can simply happen:
My drive shaft (& TT) is a replacement. The builder of the car fragged the original DS and replaced it with the one I have now. (The TT) still has "944 - $150" painted on it. Anyway, who knows what condition it was in when it was installed.We are noticing that many 944 torque tubes coming in for rebuilds have damaged or worn out drive shafts that make them unusable for rebuilds and unacceptable for cores. Most of the problems are with the front nub of the 944 drive shaft that fits into the pilot bearing at the back of the crank shaft. This holds the drive shaft in place and keeps the drive shaft from vibrating under operation within the clutch. Pronounced vibrations will damage clutches and the drive shaft so this is a very important area to make sure it is within specifications. The easiest method is to take a pilot bearing and fit it on the nub. The fit should be snug with no looseness. The looser it feels the more the drive shaft will vibrate.
I'll spec out the adapter plate I have now and see how close to specs it is. Fingers X'd...
Last edited by acorad on Tue Feb 21, 2012 8:44 am; edited 8 times in total
acorad- Posts : 697
Join date : 2010-12-21
Location : Agoura Hills, CA
Re: Car lift installed, now the real work will begin.
![]() xschop Mon Feb 20, 2012 9:40 pm
xschop Mon Feb 20, 2012 9:40 pm
wiki.
Also turn down (lathe) the back side of your pilot adapter by 0.07". That'll fix the hub interference and if you can, grind down the back side of the hub.
xschop- Posts : 2711
Join date : 2009-06-09
Location : OKC
Re: Car lift installed, now the real work will begin.
![]() acorad Mon Feb 20, 2012 11:05 pm
acorad Mon Feb 20, 2012 11:05 pm
Thanks. Grinding down the back side of the hub was something I was thinking of. I saw something about shaft run-out over the weekend when I was researching all this stuff, I'll have to find it again. iirc, factory specs were surprisingly lax...but not sure.xschop wrote:Check the shaft run-out while you're at it. I forgot what the factory spec states. It needs to be in the wiki.
Also turn down (lathe) the back side of your pilot adapter by 0.07". That'll fix the hub interference and if you can, grind down the back side of the hub.
Anyway, I spun the shaft quite a few times specifically to see if there was noticeable run-out, and there wasn't much/any at all. It looked really true.
I'll look at my pilot adapter tomorrow again as well.
There's gotta be some way to shim the ID of the 15mm pilot bearing so as to not to have to throw out the whole friggin' drive shaft because of a worn nub? Or maybe add a few 0.001's diameter to the shaft end, no?
acorad- Posts : 697
Join date : 2010-12-21
Location : Agoura Hills, CA
Re: Car lift installed, now the real work will begin.
![]() sbwrench Tue Feb 21, 2012 7:33 am
sbwrench Tue Feb 21, 2012 7:33 am
sbwrench- Posts : 66
Join date : 2009-06-09
Re: Car lift installed, now the real work will begin.
![]() acorad Tue Feb 21, 2012 11:53 am
acorad Tue Feb 21, 2012 11:53 am
acorad- Posts : 697
Join date : 2010-12-21
Location : Agoura Hills, CA
Re: Car lift installed, now the real work will begin.
![]() acorad Tue Feb 21, 2012 5:03 pm
acorad Tue Feb 21, 2012 5:03 pm
I have a old-timer hot-rodder machinist a few doors down and showed him my drive shaft and pilot bearing.
He can't fit a 6', or whatever, DS into his lathe so he can't turn down the DS end to prep it for a sleeve. And we also talked about how I'd rather not not have to drop the TT to turn the DS end if I can avoid it - although I will if I need to, and I do know other machinists than can fit the DS into their lathes.
Anyway, he suggested making a bushing/sleeve that would press fit onto the existing worn end of the DS and then slip fit that sleeve/bushing into a bigger ID pilot bearing. A bigger ID pilot bearing would also have a bigger OD, so a new pilot bearing adapter would have to be made to accommodate it.
However, my first thought is that since the end of the DS is worn, and may be worn such that the end of the DS is out of round, how would I ensure that the sleeve/bushing that's been put on this worn end is perfectly straight and concentric to the center of the DS?
Or am I thinking too much about this?
acorad- Posts : 697
Join date : 2010-12-21
Location : Agoura Hills, CA
Re: Car lift installed, now the real work will begin.
![]() xschop Tue Feb 21, 2012 8:53 pm
xschop Tue Feb 21, 2012 8:53 pm
xschop- Posts : 2711
Join date : 2009-06-09
Location : OKC
Re: Car lift installed, now the real work will begin.
![]() RobotMachines Tue Feb 21, 2012 10:00 pm
RobotMachines Tue Feb 21, 2012 10:00 pm

RobotMachines- Posts : 165
Join date : 2009-08-09
Location : Connecticut
Re: Car lift installed, now the real work will begin.
![]() acorad Tue Feb 21, 2012 10:06 pm
acorad Tue Feb 21, 2012 10:06 pm
See there, I was going to suggest JBWeld, but I thought you guys would laugh at me!xschop wrote:High Temp RTV carefully placed on the shaft tip O.D. and Bearing I.D. Not very much, just enough to fill the void. Let it set 24Hrs and move on. This should get you plenty more service life. I have melted lead into voids before, but don't think that would be a good idea heating the bearing area in this case
acorad- Posts : 697
Join date : 2010-12-21
Location : Agoura Hills, CA
Re: Car lift installed, now the real work will begin.
![]() acorad Wed Feb 22, 2012 1:51 pm
acorad Wed Feb 22, 2012 1:51 pm
acorad- Posts : 697
Join date : 2010-12-21
Location : Agoura Hills, CA
Re: Car lift installed, now the real work will begin.
![]() acorad Wed Feb 22, 2012 6:53 pm
acorad Wed Feb 22, 2012 6:53 pm
My car is a DD, so I mostly need to not get annoyed with the clutch in my bumper-to-bumper commute.
As you probably know I pulled my shuddering like a beeeeooooch clutch recently and here's what I have now:
1) Flywheel: The FW is aluminum of unknown brand, with a riveted steel surface and a deep blue hot-spot/high-spot - which, my intertube research promises me, is what caused the shuddering.
I don't know if I can get the FW resurfaced, but regardless, I'd rather replace the FW with a heavier more daily driver-friendly unit.
Is the stock FW is a good choice for this?
2) Pressure Plate: My PP is Valeo brand, which I never heard of, and other than a hot-spot on the steel disk face that corresponds to the hot-spot on the FW, it seems to be in great condition. The hot-spot on the PP disk does not seem to be a high-spot. And, I just saw a pic of TonyG's PP that he has on his race car, and it is also Valeo brand, so that gives me some encouragement that the brand is OK. (OK, he posted a pic of the PP because he broke it, however I don't have nearly the power nor will I be tracking my car.)
So, would that dark spot on the PP face be a problem?
3) Friction disk: It has a "V" paint-stamped on it, so I assume it's also Valeo brand. The friction disk material surface looks fine, no idea what material it is.
It's 11-7/8 diameter, is that a 12" clutch?
However, the only issue I see with the friction disk is that the hub face and pilot bearing adapter are both scored from impacting each other, despite the hub face itself being about 0.20" back away from the disk friction surface, which means it's the same 0.20" away from the FW face, pilot bearing face and PB adapter face as well.
My pilot bearing adapter and pilot bearing stick out 0.8" and the FW was 0.8" as well, so they were flush with the FW face so I'm not sure how/why the hub was hitting the PB adapter.
Any ideas?
Also, as there was no rearward offset to speak of on the disk hub, the splines in the hub were not fully engaged in the drive shaft splines, so I'd like to get a disk with the proper Porsche spline pattern and much greater offset than the one I have now so it engages fully and doesn't impact my PB & adapter. And DD-friendly.
Any ideas?
4) Lastly, if I change the FW and friction disk, will I have to change/adjust the hydraulics (or whatever) because that it won't shift correctly any more?
acorad- Posts : 697
Join date : 2010-12-21
Location : Agoura Hills, CA
Re: Car lift installed, now the real work will begin.
![]() docwyte Wed Feb 22, 2012 7:39 pm
docwyte Wed Feb 22, 2012 7:39 pm
docwyte- Posts : 1393
Join date : 2010-07-18
Re: Car lift installed, now the real work will begin.
![]() Admin Wed Feb 22, 2012 8:02 pm
Admin Wed Feb 22, 2012 8:02 pm
Rockauto sells an input shaft sleeve to repair our wore out tips! Just do a search for the 944 Porsche and go to the manual trans area.
Admin- Admin

- Posts : 1448
Join date : 2009-06-08
Age : 65
Location : Arlington,Texas -

Re: Car lift installed, now the real work will begin.
![]() 87-944S Wed Feb 22, 2012 8:40 pm
87-944S Wed Feb 22, 2012 8:40 pm
87-944S- Posts : 744
Join date : 2009-06-10
Location : Maryland
Re: Car lift installed, now the real work will begin.
![]() acorad Thu Feb 23, 2012 1:04 pm
acorad Thu Feb 23, 2012 1:04 pm
Thanks Admin. Actually, I just got off the phone to Timken [who makes the sleeves] they say their shaft repair sleeves are not for use in bearings. They're for repairing a shaft that has damage from a rubber seal.Admin wrote:For those that may need it,
Rockauto sells an input shaft sleeve to repair our wore out tips! Just do a search for the 944 Porsche and go to the manual trans area.
Last edited by acorad on Thu Mar 01, 2012 11:21 am; edited 1 time in total
acorad- Posts : 697
Join date : 2010-12-21
Location : Agoura Hills, CA
Re: Car lift installed, now the real work will begin.
![]() acorad Thu Feb 23, 2012 1:10 pm
acorad Thu Feb 23, 2012 1:10 pm
Well, I just found the receipts from my car's builder, he used the RH:docwyte wrote:Best bet is to belly up and buy the spec stage 2 setup, with either their aluminum or steel flywheel. I have their aluminum flywheel and don't feel it's too harsh for a dd.
- Stage two yellow LS-1 pressure plate
- Kevlar 11.75 inch clutch disk upgrade
- 12" aluminum LS-1 flywheel
I have a call in to RH, but perhaps someone here knows who makes RH's clutches & flywheels?
This was bought from RH in 2005.
Last edited by acorad on Thu Mar 01, 2012 11:22 am; edited 1 time in total
acorad- Posts : 697
Join date : 2010-12-21
Location : Agoura Hills, CA
Re: Car lift installed, now the real work will begin.
![]() acorad Thu Feb 23, 2012 4:43 pm
acorad Thu Feb 23, 2012 4:43 pm
Well, turns out you are 100% correct!robstah wrote:CM on the rivets wouldn't be clutchmasters, would it?
acorad- Posts : 697
Join date : 2010-12-21
Location : Agoura Hills, CA
Re: Car lift installed, now the real work will begin.
![]() acorad Fri Feb 24, 2012 3:30 pm
acorad Fri Feb 24, 2012 3:30 pm
Anyway, the front end of the DS is just wobbling around, free as a bird, and sagging due to its own weight, in contrast to the rear end of the DS which is locked solid as a rock into the rear TT bearing.
One of the issues that caused me to pull the clutch was a pretty bad vibration at ~3000rpms.
Not sure if the vibration came first (some have suggested that the PP and FW should have been balanced together) and that caused the bearing to walk, or if the bearing walked and that caused the vibration, or what.
Anyway, when I spin the drive shaft the rest of the TT bearings sound fine to me, they aren't noisy or crunchy at all, so I'm thinking of just slipping another bearing/bush/carrier into the TT at the front and calling it a day.
Is there anything I'm missing or should be aware of here?
Last edited by acorad on Thu Mar 01, 2012 11:23 am; edited 1 time in total
acorad- Posts : 697
Join date : 2010-12-21
Location : Agoura Hills, CA
Re: Car lift installed, now the real work will begin.
![]() acorad Tue Feb 28, 2012 7:07 pm
acorad Tue Feb 28, 2012 7:07 pm
I mic'd how far the PB & adapter were sticking out beyond the crankshaft end that they are sitting in and it measured 0.605", I've read that that distance should only be about 0.40".
Perhaps my adapter walked out due to the clutch vibration issue I was having?
Anyway, I tried pounding the adapter back in with a block of wood and a dead-blow mallet, but got nowhere.
How do you get the adapter fully seated into the crankshaft?
acorad- Posts : 697
Join date : 2010-12-21
Location : Agoura Hills, CA
Page 4 of 6 • 1, 2, 3, 4, 5, 6 ![]()
» Inexpensive garage lift review
» Need pic from underneath car with v8 installed
» Rear coilover suspension setup
» Best engine uprights/plates
» LEAKING TPC HYDROBOOST
» HYDRAULIC THROWOUT/RELEASE BEARING NOT ENGAGING FULLY
» Fesler Saratoga Top
» Ray's 1987 944 LS1 Build & Swap
» LS 982 5speed project here
» LT1 Spark Plug make and model
» 928 5-speed kit