
 Latest images
Mon Jul 08, 2013 3:56 pm by Admin
For the benefit of 944Hybrids users there are two search functions available for you to use.
The purpose of this sticky is to explain the "Advanced Search" function because it is much more powerful and is the best choice when researching information.
When you log on to the site a list of options is shown in a line at the top of the page. One option is labelled "Search", use this option (NOT the search box lower down on the right).
After you click on the upper search option, a drop down box appears. At the bottom of this box is a radio button marked "Advanced …
Comments: 0
PorscheDoc's 951/L33 Build
Page 1 of 2 • 1, 2 ![]()

PorscheDoc's 951/L33 Build
![]() Porschedoc Sun Sep 16, 2012 11:05 am
Porschedoc Sun Sep 16, 2012 11:05 am
Everyone talks about 944's being a pain to work on, but there is nothing on even a turbo that is hard after you have done it a time or two, but after doing every job so many times I can't remember, it gets boring more than anything. People are a little shocked I can do a clutch on a turbo in 4 hours, or waterpump/belt job in the same, but once you know the tool to use for each bolt, there isn't really any challenge left. This project would be a new learning process, something enjoyable again.
As you can see, it's had a long life on track, not much of the garnett red paint left on the front end, lol. I always hated people calling the car brown, lol. A front right hit at some point (repaired), along with a few bad resprays at some point in it's life, and I guess maybe it did look brown.
[You must be registered and logged in to see this image.]
My final street interior. All sound deadening removed, GT3 seats, 930s steering wheel, rear seat delete, etc. Car weighed 2700lbs and put down 310 to the rear wheels which was enough to harass most cars on track fairly easily.
[You must be registered and logged in to see this image.]
All that's gone now. I sourced an L33 for $600 last year, and had planned to drop everything in for this year's track season, but was way too busy at the shop to work on my own stuff. Luckily, having a few extra track cars around kept me on track for the season. Took the time to roll in rod bearings and start sourcing parts for the motor. The downside of the L33 is you have to find all the accessories, etc, versus just buying a dropout LS1 out of a camaro and having most everything you need (accessories, flywheel, clutch, etc). IMHO, the final cost ends up being very comparable to buying a drop out LS1 by the time you source all this.
[You must be registered and logged in to see this image.]
Screw plastic angle gauges, lol.
[You must be registered and logged in to see this image.]
In the meantime, we broke down the body to the bare nuts.
[You must be registered and logged in to see this image.]
And I put my wife to work on the body work.
[You must be registered and logged in to see this image.]
Started playing around with weight reduction, and paint. There has been a livery I have been after for many years now. I planned on doing a white interior, and colored exterior, but after priming and spraying the interior, I wasn't happy, so back to square one.
[You must be registered and logged in to see this image.]
Finally got the body work close enough (read I stopped making more work for my painter) and sent it to off to paint.
[You must be registered and logged in to see this image.]
And the reproduction vinyl from the 935 Kremer
[You must be registered and logged in to see this image.]
After collecting F body accessories, 2 piece bellhousing, flywheel, pressure plate, etc, I hung the motor in place. Due to the 3rd runner on the driver side, I did have the massage the frame rail to clear. Runner is just out too far on that part of the header.
[You must be registered and logged in to see this image.]
Once the motor was in place, I hauled the car home so I could work on it a few minutes here and there. Leaving it at the shop, I know I would never work on it as there is just too many other things to do on a daily basis.
[You must be registered and logged in to see this image.]
Low mount alternator installed. Since I am running manual steering and the tilton dual master setup, I don't have the extra power steering pulley to run off of, so I'm currently working on that. I am going to change the alternator idle pulley to a ribbed pulley, and that should take care of that. Remote filter setup mounted up front. As soon as I get some longer allens, I'll get the weltmeister sway bar back on.
[You must be registered and logged in to see this image.]
Waiting on sheathing, but sorting the wires in the rear of the car, which is all that is left in regards to wiring in the chassis at this point. The prower probe makes short work of identifying which wires activate what, without having to bother with pulling out the wiring diagrams.
[You must be registered and logged in to see this image.]
GM Van Fuse/relay panel courtesy of SSP Wiring.
[You must be registered and logged in to see this image.]\
Fluid reservoir from a GTO for the clutch system. Bled the system with my vacuum bleeder and instantly had a good pedal. Since the transaxle is out currently (S2), it was easy to test release by spinning the torque tube with the clutch pedal depressed. The dual master reservoirs will be mounted in the old fuse panel location. I can mount them toward the windshield end, which will allow for extra height as the fuse panel cover is raised in that location. Hoses slide through the firewall grommet nicely.
[You must be registered and logged in to see this image.]
Lexan side windows back in, and the rear of the car buttoned up again. Once I have all the wiring run to the front of the car, then I'll put the lexan hatch together and get that on the car. Will be using a 968 wing for now, but eventually will go for more downforce.
[You must be registered and logged in to see this image.]
And the good wheels back on
[You must be registered and logged in to see this image.]
The next project is to start figuring out brake line connections to the Tilton masters. 10mm from the OE brake lines to the 3/8-24 is actually somewhat a pain to match up adapter wise and look clean, so I will likely custom build my own lines at this point. Concurrently, I'll get the wiring run.
Last edited by Porschedoc on Sun Nov 04, 2012 6:46 pm; edited 1 time in total
Porschedoc- Posts : 56
Join date : 2010-12-15
Location : Olathe, KS -

Re: PorscheDoc's 951/L33 Build
![]() the951racer Sun Sep 16, 2012 11:16 am
the951racer Sun Sep 16, 2012 11:16 am
the951racer- Posts : 135
Join date : 2012-01-11
Age : 40
Location : Madison, MS
Re: PorscheDoc's 951/L33 Build
![]() Porschedoc Sun Nov 04, 2012 6:57 pm
Porschedoc Sun Nov 04, 2012 6:57 pm
Finally sourced all the correct fittings to make the brakes work with the Tilton Dual Masters (not that I've had much time to worry about it anyway). The Tilton's have a -3an port, and the Porsche fittings are 10mmx1.0 bubble flare. Summit had the straight -3an to 10mm female adapter, and also the -3an to dual 10mm female adapter all in bubble flare.
To make clearance easier, I mounted the 13/16" master on top of the 5/8" master for the rears since the rear only has one connection.
[You must be registered and logged in to see this image.]
New junction line from the rear master cylinder bent to the cowl where I used a 10x1.0mm female female union (also from summit racing) and new flare to connect the lines. My commercial guy at Oreilly's got me the 10x1.0 bubble flare male fittings for the line, as well as the 3/16" line. Interestingly enough, I needed one more fitting and tried to go to the parts counter on Sunday and gave them the part number for the fitting, and he couldn't find it in the system. I can't stand dealing with auto parts store front counter people after having a good commercial salesman. WTF
[You must be registered and logged in to see this image.]
Then mounted the adapter for the front lines. One of these fittings I still need to change to a longer fitting, hence my run to oreilly's on Sunday, but not a big deal at this point.
[You must be registered and logged in to see this image.]
And following the same principle, connection in the cowl.
[You must be registered and logged in to see this image.]
And for the most part completed.
[You must be registered and logged in to see this image.]
Porschedoc- Posts : 56
Join date : 2010-12-15
Location : Olathe, KS -
Re: PorscheDoc's 951/L33 Build
![]() hpt951 Fri Nov 09, 2012 6:31 pm
hpt951 Fri Nov 09, 2012 6:31 pm
hpt951- Posts : 28
Join date : 2011-11-13
Location : Lenexa, KS

acorad- Posts : 697
Join date : 2010-12-21
Location : Agoura Hills, CA
Re: PorscheDoc's 951/L33 Build
![]() Porschedoc Sat Nov 10, 2012 12:59 pm
Porschedoc Sat Nov 10, 2012 12:59 pm
hpt951 wrote:that's going to make my swap look pretty sloppy!
Lol, the difference is yours was running within 3 months!
Porschedoc- Posts : 56
Join date : 2010-12-15
Location : Olathe, KS -
Re: PorscheDoc's 951/L33 Build
![]() turbobob924 Sat Nov 10, 2012 4:59 pm
turbobob924 Sat Nov 10, 2012 4:59 pm
project looks cool so far.

turbobob924- Posts : 218
Join date : 2009-06-16
Location : Hinckley Ohio -
Re: PorscheDoc's 951/L33 Build
![]() LEEEZARD7 Sat Nov 10, 2012 6:37 pm
LEEEZARD7 Sat Nov 10, 2012 6:37 pm
LEEEZARD7- Posts : 148
Join date : 2011-07-23
Location : OKLAHOMA
Re: PorscheDoc's 951/L33 Build
![]() Porschedoc Mon Nov 19, 2012 7:45 pm
Porschedoc Mon Nov 19, 2012 7:45 pm
Finishing up the fuel system in the rear, but not much to show at this point.
After talking with Todd, I'm not sure why it didn't occur to me to remove the extra spacer from the weltmeister sway bars, so I knocked that out tonight. A trip to the hardware store for some shorter bolts (weltmeister.......uses standard hardware...go figure), and that was taking care of. I did add some longer allen bolts and spacers to keep the system level as possible with the frame. And yes, I see the paint error that got missed. Will have to spray the bottom of the frame rail before putting too much more back on.
[You must be registered and logged in to see this image.]
Threw a temporary rear hatch on for the time being until I can find the time to build a lexan hatch. Kind of having to pick and choose my battles in order of importance right now.
[You must be registered and logged in to see this image.]
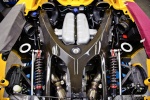
Finally sourced an LS6 intake and installed that tonight.
[You must be registered and logged in to see this image.]
Last night I was playing around with the vinyl. One total mess up on my part. I had a sunroof delete chassis in storage that I should have cut the top off and done a sunroof delete conversion. The 935 Kremer didn't have a sunroof, so the decals up there are going to take some creativity. The 935 used larger vinyl on the roof, and smaller vinyl on the hood due to a smaller hood. I think I will have to flip flop, and run larger vinyl on the hood since there is much more space, and the smaller vinyl on the roof. The sunroof seal is my nemesis right now. If I cut the vinyl like should be done, you will see a black seal running through the middle of white lettering. Dunno, I'll figure it out.
[You must be registered and logged in to see this image.]
Also built an L bracket brace for the clutch master like I have done in the past on many cars. It is simple and works. Clutch pedal is a heavy bugger with the SPEC stage II, and I've adjusted the spring which made it better. My car has always had a slightly heavier pedal than the ton of other 944's I've worked on have had. Ok for me, but not sure how long my wife will last on track if she has to push that thing in and out a bunch, lol. In the long run might put a stock pressure plate in eventually.
I've got a bar for the brake master at the shop, I just need to bring it home and install in on the brake bracket. I will run it straight to one of the camber plate mounting bolts, swapping the bolt out for a longer one to accept the adjustable rod.
Porschedoc- Posts : 56
Join date : 2010-12-15
Location : Olathe, KS -
Re: PorscheDoc's 951/L33 Build
![]() eclou Tue Nov 20, 2012 10:47 pm
eclou Tue Nov 20, 2012 10:47 pm

eclou- Posts : 102
Join date : 2010-01-14
Re: PorscheDoc's 951/L33 Build
![]() Porschedoc Wed Nov 21, 2012 7:57 am
Porschedoc Wed Nov 21, 2012 7:57 am
eclou wrote:nice work Doc. Glad to see you back after Imagine Auto
Thanks Gene!
Porschedoc- Posts : 56
Join date : 2010-12-15
Location : Olathe, KS -
Re: PorscheDoc's 951/L33 Build
![]() xschop Wed Nov 21, 2012 9:30 am
xschop Wed Nov 21, 2012 9:30 am

xschop- Posts : 2711
Join date : 2009-06-09
Location : OKC
Re: PorscheDoc's 951/L33 Build
![]() Techno Duck Wed Nov 21, 2012 6:17 pm
Techno Duck Wed Nov 21, 2012 6:17 pm
Techno Duck- Posts : 447
Join date : 2010-12-01
Location : San Diego, CA
Re: PorscheDoc's 951/L33 Build
![]() Porschedoc Wed Nov 21, 2012 7:05 pm
Porschedoc Wed Nov 21, 2012 7:05 pm
xschop wrote:Nice build Doc. What Control arms are you using? Years ago I modded a set of RX7 3rd gen sways to fit and were stiffer than M030
They are Charlie arms. The holy grail early offset arms. Charlie at wright wood racing makes them though now he only runs a batch every couple of years And you never know which offset he is going to run
968 m030 bars are a nice upgrade for the street but IMHO aren't good enough for heavy track use which is why I run the weltmeisters front and rear.
Jon,
Right now still running a fairly new oe master. If anyone has found a master that makes the pedal lighter I'm all ears!
I felt Todd's in his ls1 with a stock Ls1 pressure plate and oe master and his is really easy to push
Porschedoc- Posts : 56
Join date : 2010-12-15
Location : Olathe, KS -
Re: PorscheDoc's 951/L33 Build
![]() Arthropraxis Wed Nov 21, 2012 9:17 pm
Arthropraxis Wed Nov 21, 2012 9:17 pm
Arthropraxis- Posts : 1103
Join date : 2009-09-02
Re: PorscheDoc's 951/L33 Build
![]() Porschedoc Wed Nov 21, 2012 9:37 pm
Porschedoc Wed Nov 21, 2012 9:37 pm
Arthropraxis wrote:What brakes are you using? I am running the Tilton dual system and experimented with several MC setups with factory 87 turbo brakes. I settled on .625F and .70R with a little over 50% going to the front. The pedal effort is more than a power system but not by much and the modulation is much better.
Standard turbo brakes running either hawk or pagid race pads. Car will weigh sub 2400lbs.
Porschedoc- Posts : 56
Join date : 2010-12-15
Location : Olathe, KS -
Re: PorscheDoc's 951/L33 Build
![]() Arthropraxis Thu Nov 22, 2012 7:23 am
Arthropraxis Thu Nov 22, 2012 7:23 am
Arthropraxis- Posts : 1103
Join date : 2009-09-02
Re: PorscheDoc's 951/L33 Build
![]() Porschedoc Thu Nov 22, 2012 7:41 am
Porschedoc Thu Nov 22, 2012 7:41 am
Arthropraxis wrote:Have you looked at the Porterfield pads? I have the street pads and they work great, the CF is higher than most street pads. I have read good reviews on their race pads.
I've used about every race pad out there at one point or another. I would classify the Porterfield R4 as a budget, entry level track pad. Once you really start running the car hard and really using the brakes, they start to melt and leave deposits on the rotors which can cause some pretty nasty vibrations. You get what you pay for with brakes. If they are cheap, they aren't going to be all that great.
Porschedoc- Posts : 56
Join date : 2010-12-15
Location : Olathe, KS -
Re: PorscheDoc's 951/L33 Build
![]() Porschedoc Mon Dec 17, 2012 4:06 pm
Porschedoc Mon Dec 17, 2012 4:06 pm
Figured out a mounting solution for the larger LSX computer in the stock location. Wish I had not have ordered the wiring harness from the engine quite so long, but it would be a major project to shorten it, so I'll just have to deal with some extra slack.
[You must be registered and logged in to see this image.]
Once the ECU's location was determined, then I could start wiring a few loose ends on the fuse panel as it does connect directly to the ECU.
[You must be registered and logged in to see this image.]
And after enough digging on the forum, found the solution to running the OEM gauge cluster. I was debating building a custom dash and using custom gauges, but really liked the idea of keeping the original cluster/dash assembly. It won't be easy to wire everything up that I need to the cluster, but I think the result will be better. I added a VDO oil pressure sensor, as mentioned in many threads, similar in design to the 944 sensor using an LS1 adapter from Speedway motors.
[You must be registered and logged in to see this image.]
Temp sensor is the same deal, again, using a custom adapter from Summit racing, and an early 944 temp sensor. Simple plug and play in the passenger side coolant port.
[You must be registered and logged in to see this image.]
Then I tackled getting all the wiring built and run from the front of the car for turn signals and parking lights. That all went pretty easy. The power probe III that I have discussed before is invaluable for this type of work as you can apply power and ground to a component to make sure you have the wiring correct. For the flasher component of the turn signal, I used a simple 2 prong flasher relay inline, all wired into the stock turn signal assembly. Easy pleasy.
[You must be registered and logged in to see this image.]
Building the harness from the wiper stalk to the wiper motor was very similar. Using the power probe, I could find my low and high wiper signals and wire that appropriately to the OE wiper stalk. The overspray on the wiper motor arm is going to bug me, so I'll pull that off quick and put it in the bead blaster to clean it up.
[You must be registered and logged in to see this image.]
And a pile of wiring come out underneath the dash. Making my own wiring diagrams as I go.
[You must be registered and logged in to see this image.]
Wiring ready for install on the 2 sensors I installed on the motor, but I ran out of cable sheathing, so I have some more on order. I like using a good quality mesh sheathing rather than the cheap stuff you can at the parts store. The cost is similar, but the quality much better when ordering online in bulk.
[You must be registered and logged in to see this image.]
With a very general idea of switches I would need, I build a switch panel. Well....I ordered a switch panel which came completely disassembled, so I had to put the entire thing together and wire it. I figured that would take about 15 minutes, yet about 3 hours later I was finally done. It now houses a main ignition switch, starter button, two accessory switches, light switch, and one blank which will get used likely for a cool shirt power feed.
[You must be registered and logged in to see this image.]
And the switch panel mounted along with a trim strip for the lower dash. I still need to reinforce the bottom of the dash to the firewall so it doesn't flex at all, but that won't take long. I've been kicking around the mounting for about 2 weeks now, which was holding all the other wiring up, so I finally figured out a simple, yet functional solution. Now I can start hooking up components much faster.
[You must be registered and logged in to see this image.]
Next up I need to cut a plate to block off the original blower motor location, finish connecting components to the dash switches, and then start wiring up the gauge cluster. That should be time consuming. Once the cluster is hooked up and functional, I should be able to start cranking the motor to build oil pressure.
Porschedoc- Posts : 56
Join date : 2010-12-15
Location : Olathe, KS -
eclou- Posts : 102
Join date : 2010-01-14
acorad- Posts : 697
Join date : 2010-12-21
Location : Agoura Hills, CA
Techno Duck- Posts : 447
Join date : 2010-12-01
Location : San Diego, CA
Re: PorscheDoc's 951/L33 Build
![]() Porschedoc Tue Dec 25, 2012 1:58 pm
Porschedoc Tue Dec 25, 2012 1:58 pm
Porschedoc- Posts : 56
Join date : 2010-12-15
Location : Olathe, KS -
eclou- Posts : 102
Join date : 2010-01-14
Re: PorscheDoc's 951/L33 Build
![]() Porschedoc Tue Mar 05, 2013 2:16 pm
Porschedoc Tue Mar 05, 2013 2:16 pm
Currently waiting for the 20" of snow we had to melt so I can dig the trailer out and get the car over to have the windshield installed. Once that is done, off to alignment, throw the LSD transaxle in, the big fat 996TT wheels on, and then depending on the weather, it will be ready for some road time. I still need to come up with a better radiator hose solution, upper is ok, but not really happy with the lower hose due to the angles (my radiator lower port comes off at 45 degrees). I'll figure something out, as well as build the ducting for the radiator, but that shouldn't take long. Want to get as much seat time in it as I can before PCA Mayfast @ Hallett in May.
Got the exhaust finished up. After much debate and impatience, I decided to stick with a 3" single exhaust, connecting Eric's headers to a Y pipe, then to my Fabspeed Catback exhaust. Sounds wicked.
[You must be registered and logged in to see this image.]
Interior is about buttoned up, a couple of wires to connect and that should do it. Still trying to figure out why my fuel gauge isn't working correctly at the moment, but that shouldn't take long to remedy. Stock cluster and homemade wiring harness. It was fun pinning everything up to work.
[You must be registered and logged in to see this image.]
While I wanted to run the intake straight through to the header panel, my aftermarket radiator is a little too tall, so had to do the 90 degree twist instead.....which also meant building a hood pin mount the intake could pass through since it was right in line. The things you figure out after you have located and drilled the hood for the pins......
[You must be registered and logged in to see this image.]
And the reproduction vinyl from the 935 Kremer. A few more decals to lay, but mostly complete now.
[You must be registered and logged in to see this image.]
Porschedoc- Posts : 56
Join date : 2010-12-15
Location : Olathe, KS -
Page 1 of 2 • 1, 2 ![]()
» LS 928 5speed project here
» Ray's 1987 944 LS1 Build & Swap
» C5 bellhousing to torque tube adapter plate.
» 951 Transaxles For Sale
» Turbo Transaxle wanted
» Adapter plate
» LEAKING TPC HYDROBOOST
» Fesler Saratoga Top
» Parts availability for general maintenance?