
 Latest images
Mon Jul 08, 2013 3:56 pm by Admin
For the benefit of 944Hybrids users there are two search functions available for you to use.
The purpose of this sticky is to explain the "Advanced Search" function because it is much more powerful and is the best choice when researching information.
When you log on to the site a list of options is shown in a line at the top of the page. One option is labelled "Search", use this option (NOT the search box lower down on the right).
After you click on the upper search option, a drop down box appears. At the bottom of this box is a radio button marked "Advanced …
Comments: 0
Xschop's 5.3 LM7 build
Page 9 of 17 •  1 ... 6 ... 8, 9, 10 ... 13 ... 17
 ![]()
Re: Xschop's 5.3 LM7 build
![]() xschop Thu Mar 17, 2011 11:39 am
xschop Thu Mar 17, 2011 11:39 am
Arthropraxis wrote:Is it possible/practical to get a new drive shaft made with the Corvette spline?
Yes absolutely and the spline pattern I believe would be 26 by 1.125". The 944 TT bearings and sleeves could easily be modified/changed. Also the pilot tip that is machined onto the shaft could be made to fit a stock GM pilot bearing...

xschop- Posts : 2711
Join date : 2009-06-09
Location : OKC
Replacement shafts
![]() fliermike45 Thu Mar 17, 2011 3:48 pm
fliermike45 Thu Mar 17, 2011 3:48 pm
Ask him about possibly supplying shafts with Corvette splines.
fliermike45- Posts : 778
Join date : 2009-09-19
Re: Xschop's 5.3 LM7 build
![]() Arthropraxis Thu Mar 17, 2011 4:11 pm
Arthropraxis Thu Mar 17, 2011 4:11 pm
We extend it to 1.200+ to optimize input shaft stability and keep them from twisting at high tq levels. For comparison a normal spline length would be in the area of .780.
David Norton
P 800-828-4379 Ext: 110
F 205.491.8593
[You must be registered and logged in to see this link.]
Arthropraxis- Posts : 1103
Join date : 2009-09-02
Re: Xschop's 5.3 LM7 build
![]() xschop Thu Mar 17, 2011 4:29 pm
xschop Thu Mar 17, 2011 4:29 pm
xschop- Posts : 2711
Join date : 2009-06-09
Location : OKC
Arthropraxis- Posts : 1103
Join date : 2009-09-02
Re: Xschop's 5.3 LM7 build
![]() xschop Thu Mar 24, 2011 3:01 pm
xschop Thu Mar 24, 2011 3:01 pm
If it's feasable, there is a set of 4340 chromoloy shafts for sand buggies that fit our CV's and the stronger Type 2 cv's and are 21.375" length. All later manual cars have 21.3125" length axles shafts. Only real question I have is if I leave off the inner concave washers, will the shafts hit inside the stub axles or do the CV joints keep the shaft from high lateral movement?
[You must be registered and logged in to see this image.]
xschop- Posts : 2711
Join date : 2009-06-09
Location : OKC
Re: Xschop's 5.3 LM7 build
![]() 87-944S Thu Mar 24, 2011 4:27 pm
87-944S Thu Mar 24, 2011 4:27 pm
87-944S- Posts : 744
Join date : 2009-06-10
Location : Maryland
Re: Xschop's 5.3 LM7 build
![]() xschop Thu Mar 24, 2011 4:40 pm
xschop Thu Mar 24, 2011 4:40 pm
BTW I have been running Pex #10-204 type 2 CV's on the driver's side for a while now. They are a direct fit for VW# 211-501-331-B or EMPI #87-9917
I mic'd the 944 CV balls at 17.5mm Dia. and the Type 2's are 19.05mm brand new and ARE HEAT TREATED... So I suspect that the BlindChicken writeup had a rebuilt Type 2 that they used as mock-up.
xschop- Posts : 2711
Join date : 2009-06-09
Location : OKC
Re: Xschop's 5.3 LM7 build
![]() xschop Thu Mar 24, 2011 5:13 pm
xschop Thu Mar 24, 2011 5:13 pm
Last edited by xschop on Tue Aug 02, 2011 2:33 pm; edited 1 time in total
xschop- Posts : 2711
Join date : 2009-06-09
Location : OKC
Re: Xschop's 5.3 LM7 build
![]() 948 Thu Mar 24, 2011 9:27 pm
948 Thu Mar 24, 2011 9:27 pm
I think the Type 2 CV's have a little less plunge action than the OEM 944 CV's. If that is true then you would have less of a chance of the shaft hitting the inner sections of the flange. I would be more concerned about not enough plunge; thats how the cages break.

948- Moderator

- Posts : 573
Join date : 2009-06-09
Age : 109
Location : East PA
Re: Xschop's 5.3 LM7 build
![]() v8carreragts Thu Mar 24, 2011 9:40 pm
v8carreragts Thu Mar 24, 2011 9:40 pm
Stock CV's are 100mm and the 930 is 108mm diameter. The Type 2 CV's are 2mm thinner than the 944's.

v8carreragts- Posts : 332
Join date : 2009-06-08
Age : 67
Location : Tucson, AZ
Re: Xschop's 5.3 LM7 build
![]() xschop Fri Mar 25, 2011 4:05 am
xschop Fri Mar 25, 2011 4:05 am
And yes the Type 2 cv's have +- 1mm less plunge axially than the type 4's because the outer race is 32mm whereas the type 4 cv is 34mm. However the inner races are both 28mm and fit perfectly on the 944 shafts with inner and outer snap rings installed. The cages are beefier too on the type 2's
As to V8 carrera, I saw a G31 (non turbo) tranny up close a few days ago and wondered how the pinion gear and ring gear rotate and are situated on the back?
xschop- Posts : 2711
Join date : 2009-06-09
Location : OKC
Re: Xschop's 5.3 LM7 build
![]() 948 Fri Mar 25, 2011 6:54 am
948 Fri Mar 25, 2011 6:54 am
Also, check the range of articulation, IIRC the Type 2's have less than the OE ones had.....but IIRC they were still fine for the 944 arm movement.
948- Moderator
- Posts : 573
Join date : 2009-06-09
Age : 109
Location : East PA
Re: Xschop's 5.3 LM7 build
![]() xschop Fri Mar 25, 2011 8:01 am
xschop Fri Mar 25, 2011 8:01 am
At any rate I will lathe a Circlip groove 2mm wide only to the spline valley depth and stick on new inner stop rings. The factory stop rings are 33 spline and full circular and stop on an inner catch base that creates a stress riser area in the shaft. I'll post dims shortly so you can see what I'm saying.
[You must be registered and logged in to see this image.]
xschop- Posts : 2711
Join date : 2009-06-09
Location : OKC
Re: Xschop's 5.3 LM7 build
![]() 948 Fri Mar 25, 2011 11:59 am
948 Fri Mar 25, 2011 11:59 am
xschop wrote:I originally saw your post over on Gestapoville about the 944 rear control arm articulation not being anywhere near type 2 cv's 17 degree max. The Appletree rep said that 17 degrees is from parallel in all directions, is that the case?
At any rate I will lathe a Circlip groove 2mm wide only to the spline valley depth and stick on new inner stop rings. The factory stop rings are 33 spline and full circular and stop on an inner catch base that creates a stress riser area in the shaft. I'll post dims shortly so you can see what I'm saying.
IIRC the angle I measured was something like 8 dgrees in one directon and 10 in the other, either way is lower than the quoted angle. (You can measure on the bench to be sure).
You could try to cut a pocket, with a large radius, at the base of the shoulder you machine into the spline? A radius would help reduce any stresses.
948- Moderator
- Posts : 573
Join date : 2009-06-09
Age : 109
Location : East PA
Re: Xschop's 5.3 LM7 build
![]() v8carreragts Fri Mar 25, 2011 5:05 pm
v8carreragts Fri Mar 25, 2011 5:05 pm
As to V8 carrera, I saw a G31 (non turbo) tranny up close a few days ago and wondered how the pinion gear and ring gear rotate and are situated on the back?
If you compare both transaxles you will see that both shafts spin the same directions but the pinion gear is on the front of the lower shaft on the 016 and the pinion gear is on the rear of the lower shaft on the G31. The ring gears are on opposite sides of the cases. Because pinion gears drive the ring gears from the outside edge you need the ring gears on opposite sides for each type to drive the same direction.
v8carreragts- Posts : 332
Join date : 2009-06-08
Age : 67
Location : Tucson, AZ
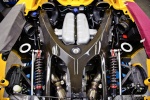
Line-bored 1" X-member Drop....
![]() xschop Sat Mar 26, 2011 5:51 pm
xschop Sat Mar 26, 2011 5:51 pm
[You must be registered and logged in to see this image.]
The way the factory should have done it.....
[You must be registered and logged in to see this image.]
Clamp it in and use a dial indicator to get it 100% true...
[You must be registered and logged in to see this image.]
And pre-drill with a locator first. Drill with 12mm bit, then pre-drill bottom and repeat for both sides...
[You must be registered and logged in to see this image.]
Then clean-up the new bolt area for new washers to seat nicely...
[You must be registered and logged in to see this image.]
Then I milled the motor mount locations for 1/2" setback for the V8 install...
[You must be registered and logged in to see this image.]
Then I lathed out 4 brand new 1.00" billet X-member spacers to complete the mod....
[You must be registered and logged in to see this image.]
Last edited by xschop on Wed Nov 28, 2012 11:00 am; edited 1 time in total
xschop- Posts : 2711
Join date : 2009-06-09
Location : OKC
Cross member
![]() fliermike45 Sat Mar 26, 2011 6:01 pm
fliermike45 Sat Mar 26, 2011 6:01 pm
Question, I'm curious about you elongating the engine mount holes, I have just done a trial engine fit and I have 1/2 inch between the driver's side head and the firewall reinforcing plate. How can you use that elongation?
How much are you going to charge for the x-member mods and 1" spacers? I assume that one must use the bump steer units you manufacture.
fliermike45- Posts : 778
Join date : 2009-09-19
Re: Xschop's 5.3 LM7 build
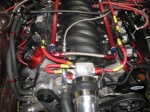
![]() xschop Sat Mar 26, 2011 6:14 pm
xschop Sat Mar 26, 2011 6:14 pm
[You must be registered and logged in to see this image.]
And I'm going to post this one for sale as a complete kit with TPC engine mounts with AC capability. You would have to get the TPC Bump-steer kit as I don't want to be mailing spindles, especially M030 stuff that I can't trust USPS with ....LOL.....
[You must be registered and logged in to see this link.]
xschop- Posts : 2711
Join date : 2009-06-09
Location : OKC
Crossmember
![]() fliermike45 Sat Mar 26, 2011 7:38 pm
fliermike45 Sat Mar 26, 2011 7:38 pm
I see from your picture that you offset transmission mount controls the setback of the engine.
I queried the engine setback as you can see from my photo that the drivers side cylinder head is touching the nut retaining the firewall stiffener plate. (Will change that to a coach bolt). There is 1/2 inch between head and firewall.
You said in an earlier PM that things vary by the quality of the techs on the day. LOL
Is there variation on the distance from the crossmember to the firewall?
[You must be registered and logged in to see this image.]
fliermike45- Posts : 778
Join date : 2009-09-19
Re: Xschop's 5.3 LM7 build
![]() xschop Sat Mar 26, 2011 7:58 pm
xschop Sat Mar 26, 2011 7:58 pm
Last edited by xschop on Sat Mar 26, 2011 8:26 pm; edited 1 time in total
xschop- Posts : 2711
Join date : 2009-06-09
Location : OKC
Setback
![]() fliermike45 Sat Mar 26, 2011 8:21 pm
fliermike45 Sat Mar 26, 2011 8:21 pm
How can one move the engine back when there is only 1/2 inch firewall clearance and the engine mounts are in the stock crossmember mounting holes. If I elongate the crossmember holes the engine will touch the firewall. Does your car have different engine bay dimensions?
I just don't see what I'm missing.
fliermike45- Posts : 778
Join date : 2009-09-19
Re: Xschop's 5.3 LM7 build
![]() xschop Sat Mar 26, 2011 8:30 pm
xschop Sat Mar 26, 2011 8:30 pm
More than likely there is some slight variation between the X-member to firewalls as you can see the X-member to frame holes are slotted from the factory. Between the X-member/frame slotted holes and the X-member/engine mount slotting and the V8 trans mount, you have ultimate adjustability.
Also the main point is that even 3/8" set back of the engine gives you an extra 1/2" or so throttle body to hood clearance because the LS throttle body is right in the curvature of the hood, not to mention if you have the hood latch, your air intake boot will also not be touching....check out CFjoija's thread after he installed his V8 mount.
DID you already install your V8 mount? Because the thinner steel reinforcement plate will actually have about 3/8"-1/2" seperation from rear driver's head whereas the 1/4" thick billet brake plate (what I run) has 1/4" seperation....make sense?
xschop- Posts : 2711
Join date : 2009-06-09
Location : OKC
Setback
![]() fliermike45 Sat Mar 26, 2011 8:57 pm
fliermike45 Sat Mar 26, 2011 8:57 pm
In addition, my Griffin radiator is in front of the old radiator mounting point and completely under the header panel.
Yes I'm concerned about the hood clearance but as yet have not cut away the center beam for a trial fit. I think I am going to have to grind away a portion of the throttle body also. I'm using Sloan's 1/2" x-member spacers.
I am very concerned about the head to firewall clearance, I'm using a Sloan stainless firewall plate, the big one, I believe its 1/8" thick. I went through this same problem with my V6 MGB and solved it by using a big hammer on the firewall, this is not possible on the 944.
fliermike45- Posts : 778
Join date : 2009-09-19
Re: Xschop's 5.3 LM7 build
![]() xschop Sat Mar 26, 2011 9:04 pm
xschop Sat Mar 26, 2011 9:04 pm
To answer the $$$ question. I was going to mod the X-members and make the billet spacers for $300 plus shipping but realized the steering shaft will need an extra 1" extension (like what I did in my gallery)....$400 plus shipping with the shaft extension mod. I need to build a lockdown plate soon...
xschop- Posts : 2711
Join date : 2009-06-09
Location : OKC
Page 9 of 17 • 1 ... 6 ... 8, 9, 10 ... 13 ... 17 ![]()
» LEAKING TPC HYDROBOOST
» Fesler Saratoga Top
» Parts availability for general maintenance?
» What coilover spring rates are you running with torsion bar removed?
» 944 Turbo TPC Radiator Install Help Needed
» HYDRAULIC THROWOUT/RELEASE BEARING NOT ENGAGING FULLY
» Best engine uprights/plates
» Rear coilover suspension setup
» Ray's 1987 944 LS1 Build & Swap