
 Latest images
HOW TO DO AN ADVANCED SEARCH.
Mon Jul 08, 2013 3:56 pm by Admin
For the benefit of 944Hybrids users there are two search functions available for you to use.
The purpose of this sticky is to explain the "Advanced Search" function because it is much more powerful and is the best choice when researching information.
When you log on to the site a list of options is shown in a line at the top of the page. One option is labelled "Search", use this option (NOT the search box lower down on the right).
After you click on the upper search option, a drop down box appears. At the bottom of this box is a radio button marked "Advanced …
Comments: 0
Similar topics
Latest topics
Log in
Hydroboost Clevis Alternative
4 posters
Page 1 of 1

Hydroboost Clevis Alternative
![]() P911P951 Wed Mar 19, 2014 7:17 am
P911P951 Wed Mar 19, 2014 7:17 am
So in mounting my Ford Hydroboost using Eric's mounting plate, I read where you are to cut one fork off of the stock clevis and attach it to the pedal with a bolt, etc. to offset the mounting by 1/4 in and up about the same thereby aligning it straight to the Hydroboost. I was a little concerned over the remaining strength and race safety of taking a normally captured clevis and using only one tine. Call me overly cautious. I was also concerned about wear and squeaking in the long term since the bolt acts as the pivot point. As an alternative I was able to use a Rod End instead and it works out. Here is what I did.
The basic steps are to cut off the head and grind down the shaft of the push rod for threading, thread the HB shaft, clearance the pedal mount bracket, drill the pedal for an M10 bolt.
F.K. Bearing CF10M rod end is what I used, about $7, a m10 x 1.5 x 30mm bolt, nylock nut, no washers needed since the joint does all the rotation. Thread the push rod to m10 x 1.5 thread for the rod end, same as for the stock clevis. I used a little grease on this rod end at final mounting but you can get lined versions as well.
The frame bracket has some area already relieved but you have to remove more from the length and the bottom edge of the relief, like below.

After threading and mounting the hydroboost, I double nut'ed the push rod assembly with one nut up against the socket of the HB where the push rod mounts and the lock nut holding it in place. That made the original shaft perfectly straight and square to the HB piston. Adjust the length of the joint to the pedal to approximately original clevis mounting hole depth noting the need for the rod end body to clear the pedal. Then I put the bolt in the rod end from the back with some paint on the end. With the head of the bolt against the frame, I partially slid the pedal arm on it's pivot to the approximate fore/aft position keeping in mind the brake light switch clearance. While holding that distance, I then slid it on further to allow the paint to mark where the hole needed to be drilled in the pedal.
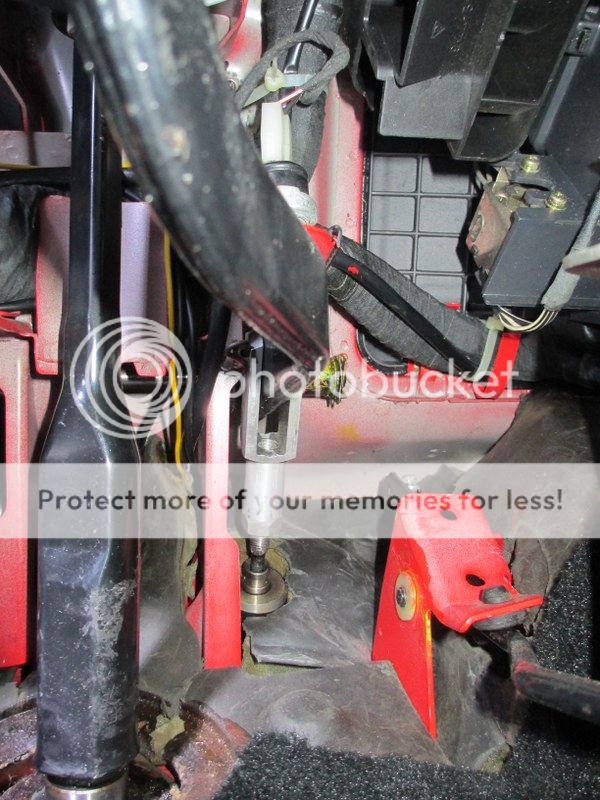
Note: Original clevis pin hole is on top of the bolt in this picture. Pic was taken upside down.

Make sure you clearance the body bracket enough to just get a 17mm wrench in to hold the head of the bolt. The picture does not really show it but there is more than an 1/8th between the bolt head and the body bracket. This pic is at the normal resting brake pedal position with about 1/4 inch of brake light switch play remaining. That distance was noted before disassembly of the stock booster so my pedal would be in the position I liked prior to conversion. Obviously you can turn the HB shaft to adjust the distance of the pedal however there is not all that much length remaining towards the firewall side to adjust with but since the end mount point is higher on the pedal arm, a little goes a long way. Get the hole in the best position to start and it will only need minor fore/aft adjustment for heel/toe adjustment.

I hope you find this useful. Sorry for the upside down pics. For those that cut your original clevis I would expect you could retrofit with a rod end as long as the HB push rod remains perfectly aligned with the HB. You may have to shorten the push rod a bit and enlarge the bolt hole. Verify alignment before any changes!
The basic steps are to cut off the head and grind down the shaft of the push rod for threading, thread the HB shaft, clearance the pedal mount bracket, drill the pedal for an M10 bolt.
F.K. Bearing CF10M rod end is what I used, about $7, a m10 x 1.5 x 30mm bolt, nylock nut, no washers needed since the joint does all the rotation. Thread the push rod to m10 x 1.5 thread for the rod end, same as for the stock clevis. I used a little grease on this rod end at final mounting but you can get lined versions as well.
The frame bracket has some area already relieved but you have to remove more from the length and the bottom edge of the relief, like below.
After threading and mounting the hydroboost, I double nut'ed the push rod assembly with one nut up against the socket of the HB where the push rod mounts and the lock nut holding it in place. That made the original shaft perfectly straight and square to the HB piston. Adjust the length of the joint to the pedal to approximately original clevis mounting hole depth noting the need for the rod end body to clear the pedal. Then I put the bolt in the rod end from the back with some paint on the end. With the head of the bolt against the frame, I partially slid the pedal arm on it's pivot to the approximate fore/aft position keeping in mind the brake light switch clearance. While holding that distance, I then slid it on further to allow the paint to mark where the hole needed to be drilled in the pedal.
Note: Original clevis pin hole is on top of the bolt in this picture. Pic was taken upside down.
Make sure you clearance the body bracket enough to just get a 17mm wrench in to hold the head of the bolt. The picture does not really show it but there is more than an 1/8th between the bolt head and the body bracket. This pic is at the normal resting brake pedal position with about 1/4 inch of brake light switch play remaining. That distance was noted before disassembly of the stock booster so my pedal would be in the position I liked prior to conversion. Obviously you can turn the HB shaft to adjust the distance of the pedal however there is not all that much length remaining towards the firewall side to adjust with but since the end mount point is higher on the pedal arm, a little goes a long way. Get the hole in the best position to start and it will only need minor fore/aft adjustment for heel/toe adjustment.
I hope you find this useful. Sorry for the upside down pics. For those that cut your original clevis I would expect you could retrofit with a rod end as long as the HB push rod remains perfectly aligned with the HB. You may have to shorten the push rod a bit and enlarge the bolt hole. Verify alignment before any changes!
P911P951- Posts : 48
Join date : 2013-06-29
Re: Hydroboost Clevis Alternative
![]() RS Technic Wed Mar 19, 2014 9:45 am
RS Technic Wed Mar 19, 2014 9:45 am
Brilliant!
I am about to start my HD & MC fitting and attachment.
The timing of this is perfect.
Very well done.
Thank you.
I am about to start my HD & MC fitting and attachment.
The timing of this is perfect.
Very well done.
Thank you.
Last edited by RS Technic on Wed Mar 19, 2014 9:46 am; edited 1 time in total (Reason for editing : spelling)

RS Technic- Posts : 73
Join date : 2013-08-12
Age : 55
Location : Bismarck, ND
Re: Hydroboost Clevis Alternative
![]() xschop Wed Mar 19, 2014 10:01 am
xschop Wed Mar 19, 2014 10:01 am
Very nice mod. Did you drill the pedal hole upwards by 3/4" ?
For a hydroboost, I would leave the hole in stock position.
Also, on my next swap I will weld in a 10mm E-clip pin just as I did for the front shifter.
For a hydroboost, I would leave the hole in stock position.
Also, on my next swap I will weld in a 10mm E-clip pin just as I did for the front shifter.

xschop- Posts : 2711
Join date : 2009-06-09
Location : OKC
Re: Hydroboost Clevis Alternative
![]() RS Technic Wed Mar 19, 2014 3:30 pm
RS Technic Wed Mar 19, 2014 3:30 pm
After re-reading and doing a little thinking, something struck me...
Instead of rethreading the HB push rod, why not just get a rod end that is already threaded for it?
everything else would apply and you can get different length rod ends to custom fit and fine tune the pedal distance.
Am I crazy for thing this? (Puts on Nomex just in case of flaming)
Instead of rethreading the HB push rod, why not just get a rod end that is already threaded for it?
everything else would apply and you can get different length rod ends to custom fit and fine tune the pedal distance.
Am I crazy for thing this? (Puts on Nomex just in case of flaming)
RS Technic- Posts : 73
Join date : 2013-08-12
Age : 55
Location : Bismarck, ND
Re: Hydroboost Clevis Alternative
![]() Techno Duck Wed Mar 19, 2014 3:54 pm
Techno Duck Wed Mar 19, 2014 3:54 pm
There is not enough space for an adapter between the two.
I used the unmodified clevis on my car with no issues. Maybe a result of using a different mounting plate.
I used the unmodified clevis on my car with no issues. Maybe a result of using a different mounting plate.
Techno Duck- Posts : 447
Join date : 2010-12-01
Location : San Diego, CA
Re: Hydroboost Clevis Alternative
![]() P911P951 Wed Mar 19, 2014 5:01 pm
P911P951 Wed Mar 19, 2014 5:01 pm
xschop,
The picture is a little elongated. It is really about 1/2 in.
I would have liked to used the original position to get the same pedal travel but for two reasons:
1. Eric's plate incorporates only a 6 degree angle in order to keep the reservoir below the hood and any tower brace interference.
2. It was stated that the push rod needed to be perfectly square with the HB piston or valve as it were, to prevent uneven wear on the o-rings inside.
In pre-fitting using the original pin hole the push rod was definitely to the point of binding in it's mount. If anyone has long term use of the HB with the push rod not square it would be nice to know how well it is holding up. If there are no issues, enlarging the original pin hole could be done up a bit to eliminate any binding. It will still been at a pretty good upward angle to where the push rod attaches to the HB. Your thoughts?
Jack
P911P951- Posts : 48
Join date : 2013-06-29
Re: Hydroboost Clevis Alternative
![]() xschop Wed Mar 19, 2014 5:41 pm
xschop Wed Mar 19, 2014 5:41 pm
You could reduce the required 12* angle by slotting the 3 mount holes, dropping the FW plate.
xschop- Posts : 2711
Join date : 2009-06-09
Location : OKC
Re: Hydroboost Clevis Alternative
![]() P911P951 Wed Mar 19, 2014 8:02 pm
P911P951 Wed Mar 19, 2014 8:02 pm
I am not running spacers so I would have to clock the HB too much I am afraid.
Good thought though. If I am unhappy with the pedal feel I could alter them by 1/2 inch, clock it more and maybe use remote fluid reservoir setup if the angle is too great.
Good thought though. If I am unhappy with the pedal feel I could alter them by 1/2 inch, clock it more and maybe use remote fluid reservoir setup if the angle is too great.
Last edited by P911P951 on Wed Mar 19, 2014 8:52 pm; edited 1 time in total (Reason for editing : added comments)
P911P951- Posts : 48
Join date : 2013-06-29
Page 1 of 1
Permissions in this forum:
You cannot reply to topics in this forum
» Ray's 1987 944 LS1 Build & Swap
» LS 982 5speed project here
» LT1 Spark Plug make and model
» 928 5-speed kit
» HYDRAULIC THROWOUT/RELEASE BEARING NOT ENGAGING FULLY
» Slave Cylinder Spacing from Clutch Fingers
» WANTED: 948 Conversion Manual
» FS 1989 Transmission for 944
» Honda k24 swap