
 Latest images
HOW TO DO AN ADVANCED SEARCH.
Mon Jul 08, 2013 3:56 pm by Admin
For the benefit of 944Hybrids users there are two search functions available for you to use.
The purpose of this sticky is to explain the "Advanced Search" function because it is much more powerful and is the best choice when researching information.
When you log on to the site a list of options is shown in a line at the top of the page. One option is labelled "Search", use this option (NOT the search box lower down on the right).
After you click on the upper search option, a drop down box appears. At the bottom of this box is a radio button marked "Advanced …
Comments: 0
Similar topics
Latest topics
Log in
Started my conversion
+4
Rich L.
fliermike45
Admin
nasomi
8 posters
Page 1 of 1

Started my conversion
![]() nasomi Wed Feb 22, 2012 10:34 pm
nasomi Wed Feb 22, 2012 10:34 pm
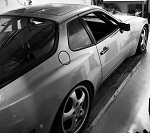
I'm officially under way in my conversion. I'm down to the intake manifold as far as removing parts goes, as well as a million vacuum lines. Everything has come off very easily thus far, minus the first manifold bolt. The other 7 came out like cake, so I gave it a bit of extra elbow grease when it resisted, and the SOB snapped... Also There was a list of things that needed to be reused in the swap, but I can't seem to find it now. Could anyone direct me?
[You must be registered and logged in to see this image.]
[You must be registered and logged in to see this image.]
nasomi- Posts : 38
Join date : 2012-02-10
Location : Collegeville, PA
Re: Started my conversion
![]() Admin Thu Feb 23, 2012 8:01 am
Admin Thu Feb 23, 2012 8:01 am
Don't waste your time pulling that old thing apart! Get it out of there. Drop it in one chunk, then chunk it!

Admin- Admin

- Posts : 1448
Join date : 2009-06-08
Age : 65
Location : Arlington,Texas -

Re: Started my conversion
![]() nasomi Thu Feb 23, 2012 10:03 am
nasomi Thu Feb 23, 2012 10:03 am
That was the plan, but I wanted to get all the 7 million feet of vacuum lines disconnected, coolant, etc, and to be honest I don't know where the engine mount bolts are, so I was kind of digging until I found them... And my jack stands are at my fathers house, so I'm having him dig them out today so I can drain the fluids.
I don't know anything about this motor, so I was trying to figure stuff out as I worked my way down.
I don't know anything about this motor, so I was trying to figure stuff out as I worked my way down.
nasomi- Posts : 38
Join date : 2012-02-10
Location : Collegeville, PA
Vac lines
![]() fliermike45 Thu Feb 23, 2012 10:49 am
fliermike45 Thu Feb 23, 2012 10:49 am
I would suggest that you don't trash your vacuum lines. There are two vac connections adjacent to the heater/ac connections on the firewall. If you plan to use a heater and a bypass valve you will need to connect to these points. There is also a vacuum tank adjacent to the battery that is part of this system, keep this. Keep all vac lines and rubber elbows etc., you will save money later.
When you remove the engine keep the end of the wiring loom with the two row 14 pin plug, I cut mine so I had about 12 inches of wire to make splices. Also you need to keep the rubber grommet that sleeves the harness where it goes into the firewall. I split mine lengthways as an easy way to remove it.
Don't open the 14 pin plug plug yet because the pins will easily fall out, plug it into it's socket (Its under a black plastic cover) and then open the plug when you need to removed the unused wires/pins.
If you plan to keep AC, save the lines, you may need to cut off the metric ends and have them welded to US fittings when you make up the new lines to the GM compressor.
Remove the cross member and steering rack and drop the engine to the floor and then lift the body over it. You are going to space the cross member down 1/2 to 3/4 inches so it has to be removed anyway.
Photograph or mark which PS lines go where on the rack, I cut my lines rather than struggle to undo the banjo line fittings on the rack that require an allen key to undo. You will probably use metric to AN fittings when you make up new lines to connect to a GM style PS pump. Remember to buy steel AN fittings for the pressure line, aluminium is ok for the return line fitting(s)
All these comments are mine and are the way I did things, others may disagree.
Last edited by fliermike45 on Thu Feb 23, 2012 11:00 am; edited 1 time in total (Reason for editing : PS Fittings)
fliermike45- Posts : 778
Join date : 2009-09-19
Re: Started my conversion
![]() nasomi Thu Feb 23, 2012 12:15 pm
nasomi Thu Feb 23, 2012 12:15 pm
Brilliant, thank you.
I don't really have room to lift the car over the motor, or the means, although my engine hoist may do it, I have to figure that out later. I only glanced under the car when it was on the jack, I wasn't going under without jack stands, so I don't really know what it looks like yet.
I'm saving everything and not breaking anything for removal, which is actually pretty easy, as everything has come off like it was put together yesterday, I'm quite impressed. Minus that one manifold stud, that is. Going to have to take the head to the shop to get that removed.
nasomi- Posts : 38
Join date : 2012-02-10
Location : Collegeville, PA
Engine lift.
![]() fliermike45 Thu Feb 23, 2012 1:21 pm
fliermike45 Thu Feb 23, 2012 1:21 pm
I have a standard Harbor Freight engine crane and used it th drop the motor out the bottom then used it to lift the car body high enough to drag the motor out. I hooked the ends of the chain to the bumper shock mounts.
[You must be registered and logged in to see this image.]
[You must be registered and logged in to see this image.]
fliermike45- Posts : 778
Join date : 2009-09-19
Re: Started my conversion
![]() Rich L. Thu Feb 23, 2012 1:29 pm
Rich L. Thu Feb 23, 2012 1:29 pm
I did roughly the same, set the engine down on a furniture dolly and hoisted the car using a load leveler and tow hooks to grab the bumper shocks through the bumper mount holes. Have the rear wheels on the ground, not on jack stands, and watch your tail pipe, mine touched.
You'll be doing this trick several times putting the v8 in and out. I got tired of it and went ahead and bought a scissor lift, so much easier.
[You must be registered and logged in to see this link.]
Good luck.
Rich
You'll be doing this trick several times putting the v8 in and out. I got tired of it and went ahead and bought a scissor lift, so much easier.
[You must be registered and logged in to see this link.]
Good luck.
Rich
Rich L.- Posts : 928
Join date : 2011-05-30
Location : Seattle
Re: Started my conversion
![]() nasomi Thu Feb 23, 2012 2:32 pm
nasomi Thu Feb 23, 2012 2:32 pm
I had seen a bunch of people dropping hte ls1 in from the top, I had assumed i'd just do it that way. I have a motorcycle lift that would slide under to grab the motor perfectly I think. I'll have to try that.
I keep meaning to ask, how do I get at the front screws to take off the front cover and headlights?
I keep meaning to ask, how do I get at the front screws to take off the front cover and headlights?
nasomi- Posts : 38
Join date : 2012-02-10
Location : Collegeville, PA
Re: Started my conversion
![]() Techno Duck Thu Feb 23, 2012 4:19 pm
Techno Duck Thu Feb 23, 2012 4:19 pm
There are 4 phillips head screws across the top by the latch. You then need to pop the headlights up, there is 1 screw per side that holds the end of the nose panel to the front corner of the fender. To get at it, you will need to pull the black rubber molding out (it is wedged in). This screw can be tough to get at, but use a flex joint, extension and 10mm socket to make it easy. Also there should be 4x 8mm nuts you see directly under the rubber trim you pull out. Finally there are two screws that hold the inner sider of the nose panel down. Poke your head by the gap left between the nose panel and headlight bucket in the upright position (looking towards the center of the car) and you will see it.. pretty sure it is a phillips head. I almost forgot about that one.. i leave it out on all my cars because its a PITA to put back on..  .
.
Techno Duck- Posts : 447
Join date : 2010-12-01
Location : San Diego, CA
Re: Started my conversion
![]() Arthropraxis Thu Feb 23, 2012 6:03 pm
Arthropraxis Thu Feb 23, 2012 6:03 pm
Clarksgarage.com has a step by step on how to remove the motor. Soak the torque tube to bellhousing bolts overnight in some kind of liquid wrench.
Arthropraxis- Posts : 1103
Join date : 2009-09-02
Re: Started my conversion
![]() nasomi Thu Feb 23, 2012 10:19 pm
nasomi Thu Feb 23, 2012 10:19 pm
And so there was the great oil spill of 2012. Foolishly I put the oil pan under the drain plug, instead of 2 feet to the side, where the oil shot out to. After I reposition it, I stand up to examine the plug. It looked like this:
[You must be registered and logged in to see this image.]
Never have I ever seen oil come out this color, and I've drained oil in cars that had head gaskets completely shot. However while I was distracted, my oil pan filled up, and overfilled, and dumped 2-3 quarts onto my garage floor. I didn't realize it, as I stared in awe at the color of this oil I was draining. Quickly I run to my splitting round where I had piles of sawdust and start tossing it under the motor, while grabbing a spare oil pan and putting it under the overflow valve.
This was not as bad as the great oil spill of 2011 though, where I forgot to put the drain plug in my diesel motor before filling it, as my exwife showed up in the middle to cause some issues, distracting me. After she left I proceeded to pour 3 gallons of oil strait through the engine and onto the ground, as I had moved the oil pan back to catch gas when I relieved pressure on the fuel system to change the lower fuel filter. And that was over asphault, where-as this was over concrete. And that was int he summer where I didn't have a splitting round or sawdust to soak up the oil right away, so it sat eating the asphault away while I drove to the store for some kitty litter. All in all, I've had better evenings, but I've had worse evenings.
Also thanks for the info, much appreciated. I will have to read through to get more info.
nasomi- Posts : 38
Join date : 2012-02-10
Location : Collegeville, PA

acorad- Posts : 697
Join date : 2010-12-21
Location : Agoura Hills, CA
Re: Started my conversion
![]() nasomi Thu Feb 23, 2012 11:06 pm
nasomi Thu Feb 23, 2012 11:06 pm
coolant and head gasket, at minimum. The last time it had been registered was 2009 when it blew the gasket, so that oil has been there for at least that long. i ran it for about 1 minute total, 30 seconds onto the car trailer and 30 seconds off, and it purred perfectly, so I'm kind of surprised to see it that bad. I'll have to wait until I get the motor out to see what's going on inside.
nasomi- Posts : 38
Join date : 2012-02-10
Location : Collegeville, PA
Re: Started my conversion
![]() Marky522 Fri Feb 24, 2012 10:44 am
Marky522 Fri Feb 24, 2012 10:44 am
Are you sure its HG and not oil cooler?
Mark
Mark
Marky522- Posts : 175
Join date : 2009-06-29
Re: Started my conversion
![]() nasomi Fri Feb 24, 2012 10:55 am
nasomi Fri Feb 24, 2012 10:55 am
I don't know, however the coolant is of similar condition.
nasomi- Posts : 38
Join date : 2012-02-10
Location : Collegeville, PA
Page 1 of 1
Permissions in this forum:
You cannot reply to topics in this forum
» Ray's 1987 944 LS1 Build & Swap
» LS 982 5speed project here
» LT1 Spark Plug make and model
» 928 5-speed kit
» HYDRAULIC THROWOUT/RELEASE BEARING NOT ENGAGING FULLY
» Slave Cylinder Spacing from Clutch Fingers
» WANTED: 948 Conversion Manual
» FS 1989 Transmission for 944
» Honda k24 swap